Installing SPFLite
Contents of Article
SPFLite is distributed as a standard compressed ZIP file. This file should be uncompressed (using standard UnZip tools, or Windows Explorer) to create the installer executable named SPFLiteSetup.EXE. Next, double-click the EXE file to start the install. Follow the install prompts to complete the installation.
When a new version of SPFLite is installed, there is no need to uninstall the previous version, or save your configuration files. The new version will install "Over the Top" of the existing version and retain all your current settings.
If the new version requires changes to your existing configuration data, the new version will contain special logic to perform the migration automatically.
An uninstall icon is created during the SPFLite install. Double click this icon to remove the program. You can also use the standard Windows Add/Remove program support in Control Panel. Just select SPFLite and click on Remove.
If this is the very first time SPFLite is executed on your system, you will be presented with some customization options to choose from.
SPFLite configuration files can be stored anywhere in your file system that you prefer, even on a Network drive. There are two parts to the configuration. They may, but do not have to, share the same folder.
Common Configuration File
This file (SPFLite.CFG) will contain all modifiable SPFLite configuration parameters.
SPFLite Data Sub-Folders
These files consist of several different working folders. It is here that you will create and store Macros, AUTO colorization files, Clipboard permanent storage etc.
SPFLite will default both of these to your \Users\You\Documents\SPFLite\folder.
A new install will present you with the following pop-up to make some initial choices.
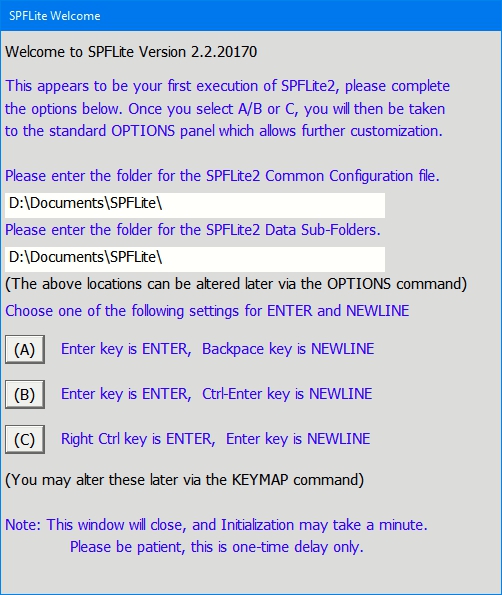
At this point, you should review and set the two folder options, and then choose whichever of the three options presented that seems closest to your preference. You can alter all of these choices later to whatever you desire, using the OPTIONS and KEYMAP commands.
A common problem for new users is to make wrong assumptions about which keys are mapped to the ISPF equivalents of ENTER and NEWLINE. If you are new SPFLite user, you may wish to make a note of which choice (A / B or C) you made.
Regardless of which you choose, you can always change these later using the KEYMAP facility.
Once you have made this selection, you will then be presented with the SPFLite Options dialog so that you can set other program options. If your feeling is "I don't have a clue what to customize" then simply press the 'Done' button You can alter any of these options later to whatever you desire, using the OPTIONS command, once you become more familiar.
Note: If you ever did run into a problem with the definition of the Enter key, and this is preventing you from using SPFLite properly, you can launch SPFLite and directly start the KEYMAP dialog to resolve this problem. See Starting and Ending SPFLite for more information.
Created with the Personal Edition of HelpNDoc: Revolutionize Your CHM Help File Output with HelpNDoc