Using the KEYMAP Dialog
Contents of Article
A Note about Line Command Mapping
Entry of key mapping definitions
Dealing with pasting errors in KEYMAP
Overriding (Passthru) Mappings
Available key mapping definition options
Auto Repeat / Set Cursor Position
Controlling the Keyboard Repeat Rate
Finalizing Your Keymap Customization
Introduction
The SPFLite Key Mapping Dialog appears as follows:
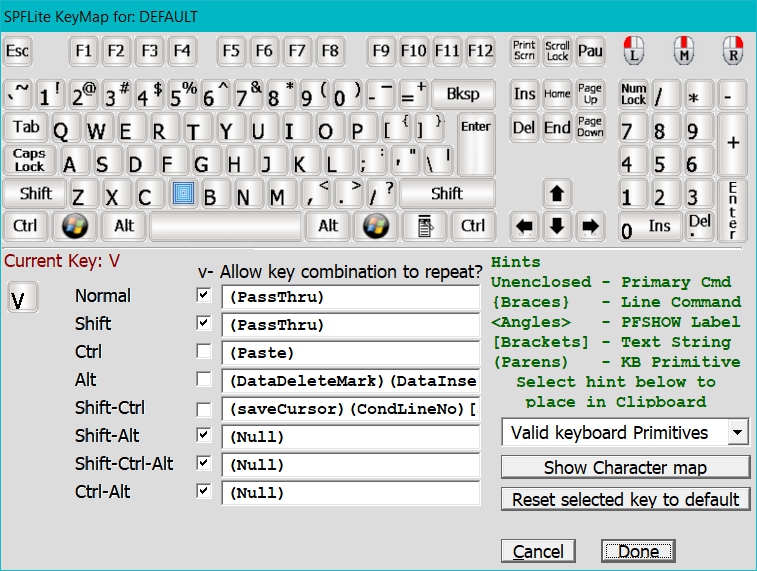
The Keymap dialog contains two basic areas.
The top half contains a map of a typical 104 key keyboard. Although layouts may differ on your computer, especially for laptop keyboards, the customization is performed via the logical key name, not its physical location. So regardless of where a key is on your keyboard, customization is done using its name. Simply use the equivalent key on the provided layout.
In the upper right hand corner, you will also see three icons representing the 3 mouse buttons. That is because these buttons are now defined in the same way as keyboard keys. (After all, that's what they are being treated like, in this function). The L, M and R refers to the Left, Middle and Right mouse buttons.
The definitions for each key are displayed in the same font as you choose for the edit session. So, if you have mapped some special-character keys, they will display here exactly as you see them in an edit session or in the (CharSet) popup window.
Because these are logical key definitions, SPFLite has no idea what your physical keyboard layout really looks like. For laptops, you may not have all these keys; there may be only one Windows key instead of two. You also may not have a physical numeric pad, but may be able to generate those keys by holding down an auxiliary key, often labeled Fn. For example, Fn + the regular 7 key may be the same as the keypad 7 key.
This means it is possible you can define a key mapping for a key that doesn't exist on your keyboard. No harm is done, but you just wouldn't be able to use it. Consult your hardware documentation for details on your particular keyboard. SPFLite is unable to map auxiliary keys such as Fn, or any extra keys such as multimedia keys, that are outside the realm of a standard 104 keyboard.
Some SPFLite users do not use a conventional US/English keyboard but instead use a national keyboard which contains additional keys required by other languages. Often, these keys require the use of the AltGr key (the right-hand Alt key, which stands for Alternate Graphic). As well, the keyboard layouts differ, and there may more or fewer keys than the layout shown above. This can make SPFLite keyboard customization a challenge.
Note: It's important to bear in mind that SPFLite internally processes data using ANSI characters only, which are stored in the Microsoft 1252 character set. MS 1252 supports the Western European languages: Afrikaans, Basque, Catalan, Danish, Dutch, English, Faroese, Finnish, French, Galician, German, Icelandic, Indonesian, Italian, Malay, Norwegian, Portuguese, Spanish, Swahili, and Swedish. That's a lot, but it's not everything. If you need to type something in a language other than those, SPFLite may not be your best choice.
These issues are assisted by:
- First, SPFLite automatically maps all alpha-numeric and special character keys which could use the AltGr key to create national characters. These should all work correctly 'out of the box'. They all have their Ctrl-Alt value set to (Passthru) instead of the normal (Null). The (Passthru) setting allows the key to perform its Windows-defined default action. (This technique works because, on keyboards that possess an AltGr key, they are designed to transmit the same keyboard data that would occur if you manually held down the Ctrl and Alt keys at the same time. So, for SPFLite purposes, the single key AltGr and the two keys Ctrl and Alt used together, mean exactly the same thing.
- Second, to assist in identifying exactly which key on your physical keyboard is equivalent to which key on SPFLite's KeyMap dialog, a utility program has been included in the distribution. The link to it is in the SPFLite Start Menu folder; look for the KeyboardTest entry. When clicked, this utility displays a console screen where you can type keys. For each key you press, it will display detailed keyboard status information. The right-hand entry on each line will identify the SPFLite key name which matches your physical key. The display looks like this:
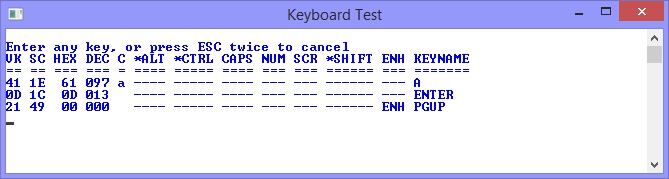
The column headed KEYNAME is the one telling you which SPFLite key needs to be customized. In the sample shown, the keys pressed were the A key, the Enter key, and the PageUp key. The KEYNAME string, like PGUP, corresponds to the name displayed in KEYMAP where you see the label Current Key for a given key.
Some keyboards have extra keys that are not used by SPFLite, and the KeyboardTest tool will report these keys as Unknown key. If this happens, you can use those keys in SPFLite for their original purpose, the same as a (Passthru) key is used, but you will be unable to remap these unknown keys. That is because SPFLite does not know what its "keyboard scan code" means, and doesn't know what to do with it, except to "pass it through".
The very fact that you can't map them means that you can't even map them to (Passthru). The point is that SPFLite will pass-through any key codes it doesn't recognize as if they were mapped to (Passthru). You don't have to do anything in SPFLite to use those keys - just use them.
If you have a multi-media keyboard with keys for things like Play, Pause and volume controls, SPFLite never sees these keys, so you don't need to worry about them.
The bottom half of the KeyMap dialog becomes active once you click on an individual key icon in the top half. In the screen display above, the V key has been selected. Note the V key graphic in the top half has been obscured, and the key is then displayed in the bottom half, along with the current action assignments for each of the eight possible chord combinations.
The right side of the bottom half provides reminders of the format of various command types you can enter in the key mapping definition fields.
Also, there is a button labeled Show Character Map. When clicked, a new separate dialog will be opened, with a character map that uses the ANSI collating sequence. See Character Maps for more information.
At the bottom are two buttons Cancel and Done. Clicking Cancel will terminate the dialog without saving any changed keyboard assignments. Clicking the Done button will save the changes and return to your edit session. Saved changes to the key map will take effect immediately; no restart of SPFLite is required to active them.
Within the Key Map window, you can jump from one of the eight various definitions (all the combinations of Shift, Ctrl and/or Alt) of a key to another by using the Tab and Backtab keys. This reduces the need to frequently alternate between the mouse and keyboard when entering many definitions for the same physical key.
A Note about Line Command Mapping
The : colon notation for key mapping of line commands that is utilized in IBM ISPF is not directly supported. In prior versions, if you tried it, you would have created invalid syntax. For example, if you previously mapped Alt-R to just :R, when you use it, it would not repeat a line but would simply report, Unknown command.
Now, an attempt to define a key with a line command like :R will result in a warning pop-up message advising the user that the command has been automatically converted to the SPFLite compatible equivalent format of {R}.
To customize a key, perform the following steps:
- On the command line enter the KEYMAP command and press Enter. The Keymap dialog (as shown above) will be displayed. (KEY and KEYS are aliases for KEYMAP.)
- On the keyboard graphic display, click on the key to be customized. The key will be obscured to indicate it is active, and the current settings for that key will be displayed in the lower half of the dialog.
- Click in the text box next to the particular chord (Normal, Shift, Ctrl, etc.) of the key you wish to alter.
- Enter your desired function definition.
Note: If all you need to do is substitute a new single character for the key, simply enter that key character, there is no need to surround it with [ ] characters.
Entry of key mapping definitions
You can enter key mapping definitions manually, or by pasting them in. You will see the text of each key mapping definition is displayed.
To assist in remembering primitive function names, a drop-down list is provided in the lower right corner of the dialog, shown as Valid keyboard Primitives. If you open this list and select an item by clicking on it, the value will be placed in the clipboard. You can then paste that value into the text box for your desired key, using the Ctrl-V key. This saves time and avoids typing errors. The full description of available primitive keyboard functions can be found in the Appendix sections: Introduction to Keyboard Primitives, Index to Keyboard Primitives and List of Keyboard Primitives.
You can also paste any text into a definition field it you obtained it from outside the KEYMAP dialog, or even outside of SPFLite. It is your responsibility to ensure that such pasted mapping definitions are properly formatted. After you paste data, you can still manually modify or correct it as needed.
Dealing with pasting errors in KEYMAP
If you were to inadvertently paste some very large amount of text into a key mapping field by mistake (say, if you forgot that you just placed a large amount of data into the Windows clipboard previously), you can press Ctrl-Z right away, which will 'undo' the paste operation and will erase the key definition field you were just working on.
To limit the effect of an inappropriate paste into one of these fields, if the clipboard contains multiple lines of text, only the first line will get pasted into a key mapping field.
Overriding (Passthru) Mappings
Ordinarily, key mappings that default to (Passthru) are left alone. But, you may have a requirement to override them. What sort of situations might call for this? Here are some possible examples:
- You have a non-US keyboard and some of the characters are in different locations
- Perhaps you want to try a non-QWERTY layout, like DVORAK
- You want to 'invert' the shift-sense of a key. For example, let's say you use SPFLite mostly to write programs in a language that uses underscores a lot (like C) but you don't use the minus sign all that much. Suppose you wanted the minus/underscore key to produce underscores by itself and minus when shifted. You could invert the minus and underscore by putting a mapping of [_] for the unshifted mapping and [-] for the shifted one.
Available key mapping definition options
|
(Passthru) |
(Passthru) is a primitive keyboard function which simply says the key should “pass through” whatever Windows would normally have done when the key is pressed. This is the standard value for most of the alphanumeric keys, and provides the most obvious key assignment. So, for instance, you don't have to spell out that the plain X key types “X” – you just “pass it through”. If you attempt to completely blank-out or delete a key definition for a Normal or Shift form, SPFLite will replace it with (Passthru). For other keys, erasing a definition will cause it to become (Null). For the mouse only, (Passthru) has no meaning and is treated the same as (Null). |
||||||||||||||||
|
(Null) |
(Null) requests that no action be performed. This is the value for unassigned key combinations. If you attempt to completely blank-out or delete a key definition (other than the Normal or Shift forms), SPFLite will replace it with (Null). When you have a key mapped to a line command, there is an implied (Enter) that is automatically inserted. In some cases, this implied (Enter) may not be what you wish. To suppress the implied (Enter), you can put (Null) after all other commands or functions. |
||||||||||||||||
|
command |
Any text entered without being enclosed in (), [], {} or <> characters is assumed to be an SPFLite primary command and its operands, and it will be entered as such on the command line. Such commands are processed as if there was an implied (Enter) function on the command. When text is entered on the command line, and a command key is pressed rather than the ENTER key, SPFLite concatenates the contents of the command line to the definition of the command key. The result is handled as a single, composite command by SPFLite. For example, when you use a Command key defined as a scroll command (UP, DOWN, LEFT, or RIGHT), the value entered on the command line becomes the operand of the scroll command. Assume you have the PageDn key mapped to the DOWN primary command. Entering HALF on the command line and then pressing the PageDn key results in a composite command of DOWN HALF being issued to scroll the screen down by half its height. You may choose to override this concatenation when you set up the command key definition by preceding the command with a ! (exclamation mark character). This causes the programmed command to replace whatever is in the command line. e.g. If you have a key programmed for RESET, it would probably be wise to prefix it with a ! to prevent the RESET command processor being confused by possible command line 'remnants' existing when the command key is pressed. Using the ! command prefix is advised for all key maps which specify a 'complete' command. A 'complete' command is one where you do not wish/expect the key action to preface something you've already entered in the Command line. For example: The 'complete' command UP MAX assigned to a key will fail if the command line is not blank when you press the key. Using !UP MAX avoids this error because the ! character causes the command line to be cleared before inserting the UP MAX command. Exceptions to this conventions are key maps which deliberately allow one or more operands to be specified by the user. For example: UP, DOWN, LEFT and RIGHT Allows the user to temporarily override the usual scroll amount by typing a number (of lines) or the letter M (max) in the command line before pressing the mapped key. HELP Allows direct access to help information about the command currently on the command line RFIND Allows the mapped key to find the first occurrence of the <from> string in a CHANGE command which is already present on the command line, |
||||||||||||||||
|
{line-cmd} |
A string enclosed in { } braces is treated as a line command. The text of the string will be entered in the line command area of the line on which the cursor is currently located. If the cursor is not currently on a valid line, then no action is performed. In ISPF, a PF key might have assigned the value of :I2 to request an insertion of two lines, a notation which SPFLite does not support. That request in SPFLite is entered as {I2}. If you attempt to define a line command using the ISPF : colon notation, SPFLite will automatically convert it to the brace notation and will issue a warning. Line Command Toggling: If you have a key mapped to a line command like {CC}, and there is any existing line command other than CC in the sequence area, the CC command will be entered there, replacing the existing command. If the sequence area already has a CC line command, and you press the key mapped to {CC}, the existing CC line command will be erased. This line-command toggling action allows you to easily undo a line command if you placed it on a line by mistake. You can toggle the state of excluded lines and User Lines with the TX and TU line commands, respectively. Suggested mappings that retain the current cursor location are as follows: Ctrl-Alt X = {TX}(Enter)(Up) Ctrl-Alt U = {TU}(Enter)(Up) Implied (Enter): When you have a key mapped to a line command such as {CC}, there is an implied (Enter) that is automatically inserted afterwards. This implied (Enter) may or may not be what you wish. If you don't want this implied (Enter), there are some ways to to address this:
Special Line Commands: There are special line-command formats for labels and tags. Note that labels and tags can be set, cleared or toggled independently of each other and can coexist on the same line.
|
||||||||||||||||
|
(primitive) |
Just as with (PassThru) and (Null) above, any string enclosed in ( ) parentheses is treated as a keyboard primitive function. Keyboard primitives are those functions other than line commands or primary commands. There are currently over 90 keyboard primitive functions available. Only primitive names predefined by SPFLite may be specified. To assist in remembering primitive function names, a drop-down list is provided in the lower right corner of the dialog, shown as Valid keyboard Primitives. If you open this list and select an item by clicking on it, the value will be placed in the clipboard. You can then paste that value into the text box for your desired key, using the Ctrl-V key. This saves time and avoids typing errors. A description of all primitive functions is provided in the "List of Keyboard Primitives" |
||||||||||||||||
|
(primitive/ ClipName) |
For primitive functions which refer to the clipboard, the default is always the normal Windows clipboard. If you wish to direct the function to use a Private Named Clipboard, the clipboard name should be provided following the primitive name, separated by a / character. For example to perform a Copy operation to named clipboard Fred, you would enter (COPY/FRED) for the key value. To perform a Paste operation from named clipboard Bill, you would enter (PASTE/BILL) for the key value.
|
||||||||||||||||
|
(cursorFunction/ count) |
These five specific cursor movement functions only will accept a count option. These functions are:
The count field causes the given function to move the cursor left, right, up or down the indicated number of columns or lines. For Column, count indicates the absolute column number on the current data line where the cursor is to be positioned. For these functions, the count field is similar to the repetition factor described next, except that the performance in repositioning the cursor is much faster. If count and the preceding slash are omitted, it is the same as if the value were 1. |
||||||||||||||||
|
(n:primitive) |
You can also specify a repetition factor for primitive functions. The repetition factor is specified as a decimal number just after the opening left parenthesis of the function, and followed by a colon. For example, the function (Right) will move the cursor one character to the right. If you wanted to move the cursor four positions to the right, you cold enter this as (Right)(Right)(Right)(Right). With a repetition factor, this can be simplified to (4:Right). Repetition factors can only be used within primitive functions in ( ) parentheses, not on un-enclosed primary commands or on the other types of enclosed keyboard items like [ ], { } or < >. A description of all primitive functions is provided in the "List of Keyboard Primitives" |
||||||||||||||||
|
[text-string] |
Any text string enclosed in [ ] brackets will be entered at the current cursor location as if manually typed from the keyboard. This could be used, for example, to enter boilerplate text, or any other repetitive phrase. Embedded blanks are allowed in the text string. You could map a key to a foreign letter by putting that one letter in brackets, such as the letter [ø]. What if your data actually contains a left or right bracket? Just double any brackets you need to use as literal values. Example: You want a key to generate: X[y] = Z Solution: In the key definition field, you enter: [X[[y]] = Z] |
||||||||||||||||
|
(nn:[text-string]) |
This variation of the normal text string enclosed in [ ] brackets is used when you desire a repetition of the provided string. In addition to being a simplified format, and allowing you to define long strings that would be awkward and error-prone to type manually, this method is also significantly faster in performance. This could be used, for example, to enter a long string of equal characters. Example: You want a key to generate a string of 40 * characters, so rather than entering: [****************************************] you enter this instead: (40:[*]) Similarly if you enter: (4:[----+----|]) it would be the same as [----+----|----+----|----+----|----+----|] |
||||||||||||||||
|
<key-label> |
Text enclosed in <> angle brackets is a key label. If present, the optional <key-label> field must be leftmost in the key definition field. A key label provides the text that will appear, along with the key name, at the bottom of the edit screen when the display of 1 or more Keyboard Help lines is enabled. (This is like the PFSHOW command in prior versions of SPFLite.) See Options - Screen for activating this option. For example, if the entry for the unshifted F3 key were coded as <End>end then it would show on the bottom of the Edit screen as F3=End. Note that what is shown as Keyboard Help is the key label, not the key definition. So, the label of the key that is displayed, and the definition of the key that is acted on, are completely different things. Key labels are helpful if you (or some other user you are assisting) need to be reminded what certain keys do. Once you can remember the definitions, the display of the key labels can be removed to save screen space. |
Multiple keyboard functions can be entered for one key. In fact, this is how keyboard macros are created, by "stringing together" a series of keyboard functions. (This is further discussed below under "Keyboard Macros".) When this is done, the functions are processed left to right. Suppose you wanted to put a label of .AA on the current line, then home the cursor, and issue a CHANGE command against that labeled line. Say you wanted to call this activity the “ABC” key. (When you perform line and primary commands like this “the hard way” you may need an intermediate Enter after the part that sets the line label.) The following key entry could accomplish this:
<ABC>{.AA}(Enter)(Home)[CHANGE ABC DEF ALL .AA](Enter) -- Version 1
However, there is no need to be so detailed. Since strings outside of any enclosures like (), [], {} and <> represent primary commands, you can just enter the primary-command as-is, if there's only one of them. Also, there is an implied (Enter) that takes place when line-command entries like {.AA} are used. That will eliminate the need for the (Home) and (Enter) functions above. The simplified, and faster version, looks like this:
<ABC>{.AA}CHANGE ABC DEF ALL .AA -- Version 2
It is important to understand that the two macro definitions are equivalent. The reason it's important is that if you use the Keyboard Recording feature and type your keystrokes in, they will be recorded literally, much like what is seen in Version 1 above. You may wish to simplify it to something more like Version 2, for performance reasons.
Allow key to Repeat / Position Cursor on Mouse-Click
This is a dual purpose field, so we will treat each separately.
- When a Keyboard Key is selected. This checkbox next to each key entry specifies whether a particular key combination is allowed to automatically repeat if that key is held down instead of being “just typed” quickly. For most normal typing keys, auto-repeat is desirable, because it makes the keyboard faster and more responsive. However, for some kinds of key mappings, auto-repeat could be a little too responsive for your own good. For example, it is common to have the primary command END assigned to F3. Let's say you had multiple tabs open for several files, and you intended to save and close of just one of them, using F3. If you inadvertently held down your F3 key a little too long you might end up closing several or all your edits before you were really done with them. For keys mapped to powerful commands like END, you should clear the checkbox, so that auto-repeat is disabled for that key. That way, keys with powerful commands that you want to carefully apply one at a time don't suddenly get repeated many times by mistake.
- When a Mouse Key is selected. This checkbox specifies whether, before any command action is performed, the cursor should be moved to the character location on the screen where the click occurred. Depending on the particular command you are going to issue, you may or may not want the cursor moved from its current location. e.g. If all you wish a mouse button to do is move the cursor, you would tick this checkbox and leave the command as (Null). Note that mouse buttons don't have an auto-repeat checkbox because mouse buttons do not auto-repeat when held down.
Controlling the Keyboard Repeat Rate
SPFLite respects the keyboard timing options that are configured in Windows. If you select the Windows Control Panel and then Keyboard Properties, you can set the keyboard Repeat Rate and Repeat Delay.
If you find that your keys are “jumping the gun” and repeating too soon when you hold them down, increasing the Repeat Delay may help. However, for most users, you will get the greatest productivity by making the keyboard operate as fast as possible.
Reset Selected Key to Default
This button on the dialog allows you to reset a key definition to the value SPFLite would have assigned on an initial installation. To use this, first select a key by clicking on the keyboard layout. Second, click in the text box for the specific key combination you want to reset (Normal, Shift, Control, Shift-Control etc.). This will place the cursor in the selected textbox. Then simply click on the Reset Selected Key to Default button.
Finalizing Your Keymap Customization
Once you are finished with your mapping activities (and you may customize as many keys at once as you like), click the Done button at the bottom. You don't have to “save” each key one at a time; Done will save every key you have defined or modified.
Created with the Personal Edition of HelpNDoc: Free help authoring environment