PRINT - Send Selected Lines to the Printer
Syntax
|
|
[ SETUP | line-control-range [ NUM | NONUM ] ] |
Operands
|
SETUP |
If SETUP is specified, it should be the only operand. It requests SPFLite to display a printer selection dialog to allow selection of your desired SPFLite default printer and printer font. |
|
line-control-range |
The range of lines which are to be processed by the command. The full syntax and allowable operands which make up a line control range are discussed in "Line Control Range Specification". |
|
NUM | NONUM |
Normally, the print output will not contain the line numbers on the left. Specifying NUM will cause these line numbers to be printed. |
Description
PRINT directs a hard copy listing of the file being edited to your chosen default printer using the formatting parameters you specified during PRINT SETUP processing. You must specify a line range, either via command line operands (the line-control-range) or via line commands. See "Line Control Range Specification" for full details of the selection options available.
The listing is formatted without the line numbers of the file in the Left margin. If desired the keyword NUM may be entered to request the line numbers on the listing.
The PRINT SETUP dialog
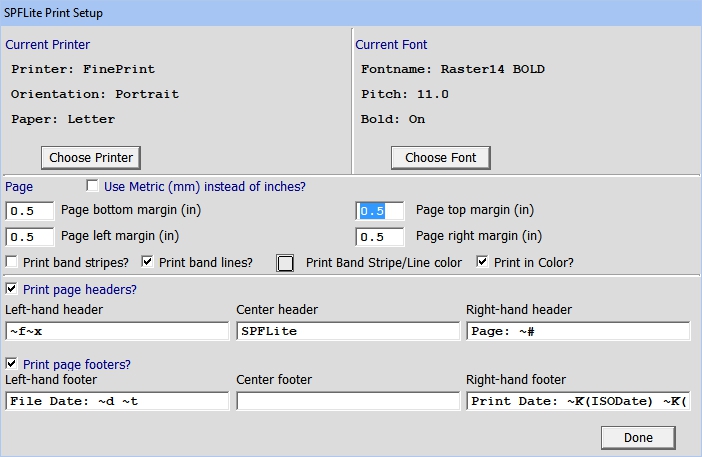
When you issue the PRINT SETUP command, the following dialog will appear:
Printer Selection
The upper left portion shows the currently assigned printer and the chosen paper and orientation settings. If you wish to alter these settings, click the Choose Printer button and you will proceed to a standard Windows Printer selection dialog. Choose the printer and paper choices you desire and close the Printer selection dialog.
Font Selection
The upper right portion shows the currently assigned Font selection along with the Font pitch and Bold setting. If you wish to alter these settings, click the Choose Font button and you will proceed to a standard Windows Font selection dialog. Choose the font, pitch and bold choices you desire and close the Font selection dialog.
If you want to print in a font that matches the supplied RASTER screen font, you can use RasterTTF. RasterTTF is the Raster font converted to TrueType format. RasterTTF has the same character set as Raster, but is intended primarily for printing files. RasterTTF has the advantage of being scalable, while Raster and Raster14 are crisper fonts for the screen. To print a mainframe-style "listing" file as 66 lines x 132 columns, you can use RasterTTF 11 Pitch, 0.5 top margin, 0.4 bottom margin, in landscape mode; there will still be room for a header and footer on the page.
Page Settings
The middle section shows the current page settings. Your first choice here is to decide between measurements in Metric or English. Check the box labeled “Use Metric (mm) instead of inches?” if you wish to use Millimeters; otherwise leave unchecked to use inches.
Next, set the desired margin values into the 4 margin boxes.
Also located in this section are the options for Background banding. Two types of banding are available
Print Band Stripes This option, if activated, imitates the old striped continuous form paper commonly used for line printers. The alternating horizontal stripes can assist greatly when reading source listings and reports.
Print Band Lines This option simply draws a horizontal line across the page every three lines.
Print Band Stripe/Line Color This box allows you to select the color to use for the Band Stripe/Line. Choose something which is not too bold and obtrusive, but which still benefits the output. You may have to experiment with your printer. When using Band Stripes, some printers (particularly laser printers) do not handle shaded areas well.
Print in color? If selected, and the file being edited has HILITE AUTO ON and has a valid .AUTO file, then the output sent to the printer will be done in the same colors as screen colorization. Otherwise, the output will be in normal uncolored text.
Page Headers and Footers
The bottom portion shows the page header and footer choices. Again, your first choice here is whether you want either of these to appear. There are two check boxes; one for Headers, one for footers. If you do not want either of these just clear their associated check box.
If you choose either or both of the header/footers to appear, then the left-hand header, center header and right-hand header fields come into play. (Same for the footer fields.)
Left-Hand Header/Footer
The data in this field will be left-justified in the Header/Footer line.
Center Header/Footer
The data in this field will be centered in the Header/Footer line.
Right-Hand Header/Footer
The data in this field will be right-justified in the Header/Footer line.
All of these fields are optional, and can be used in any combination. Note that if you enter very long strings and the page width is insufficient to 'fit' the three fields in the line, there will be some unpredictable overlaying of fields. Be aware of the sizes of these fields, particularly when using substitution variables for filenames, as these can be quite long.
Specifying the contents of headers and footers
Headers and footers can hold any desired text. Normal text placed here is left unmodified and is used as-is. However, the flexibility available comes into play when you use one or more of the many variables available which are dynamically substituted at print time to contain the current date, time, filename etc.
The following variables are available for use. Note that variables indicated by a leading ~ tilde are substituted as-is with alphabetic characters unmodified, while those indicated by a leading ^ caret are substituted with alphabetic characters set to upper case.
|
~# or ^# |
The current printed page number. |
|
~d or ^d |
The current file date as yyyy-mm-dd. |
|
~f or ^f |
The current base filename. For C:\MYDATA.TXT it would be MYDATA |
|
~n or ^n |
The current full filename including path. |
|
~p or ^p |
The current file path. |
|
~t or ^t |
The current file time as hh:mm:ss. |
|
~x or ^x |
The current file extension. For MYDATA.TXT it would be TXT |
|
~k(keyname) or ^k(keyname) |
The text returned from a keyboard definition where 'keyname' is the key name or keyboard primitive. This uses the new ~K() macro ability see the full description of these at “Working with ---” |
When you have completed your setup, click on the Done button. Your print settings will be saved and used for all subsequent PRINT functions.
Example
If you look back at the sample image above showing the PRINT SETUP dialog, the page headers and footers created when printing the file C:\Data Dir\Source.ASM using those parameters would appear as:
----+----10---+----20---+----30---+----40---+----50---+----60---+----70
Header> Source.ASM SPFLite Page: 1
000001 Source lines
000002 Source lines
000003 Source lines
.
.
.
Footer> File Date: 2012-01-13 09:10:34 Print Date: 2012-02-01 13::12:21
Note: The full text for the Right-Hand Footer is not visible in the image but contained:
Print Date: ~K(ISODATE) ~K(ISOTIME)
Created with the Personal Edition of HelpNDoc: Effortlessly optimize your documentation website for search engines