Excluded Lines
Contents of Article
Excluded lines and line-command usage
Excluded-line placeholder display and the HIDE command
Persistence of excluded lines and the STATE option
Primary command options X and NX
Primary command options MX and DX
The consequences of FIND X DX and CHANGE X DX
The ‘–' post-exclude and ‘+' post-unexclude modifiers
Introduction
Users of IBM ISPF have long had the ability to exclude lines from their edit files. SPFLite builds on this idea and adds many new, powerful features to fully exploit the benefits of line exclusion.
Note: User Lines provide a means to segregate lines into two groups, known as U lines and V lines, where U lines are a set of lines of particular interest to a user at a given point in time, and "non-User" lines are everything else. The terms User Line and U line mean the same thing; and, non-User Line, V line and ordinary data line, all mean the same thing.
User lines have a number of similarities with excluded lines, but User lines are not hidden and then revealed the way excluded lines are. If you only need two types of lines to work with, using User Lines may be simpler than using excluded lines. While User Lines are simpler, and share many similarities with excluded lines, there are also fewer supported features with User Lines. Both techniques have their place.
See Working with User lines for more information.
An excluded line is a line that exists, but is not visible. When multiple adjacent lines are excluded, the entire range of lines is visually collapsed and represented as a single line with a placeholder. Excluding lines serves a number of purposes. It gets lines “out of the way” when some lines are more important than others at a given time. It segregates lines into two groups, so that a FIND or CHANGE could be limited to one of the two types of lines (excluded, or non-excluded). Commands like DELETE ALL X or DELETE ALL NX can quickly get rid of selected, unwanted lines in a file, and so on.
The exclusion status of a line is either excluded or unexcluded. Sometimes the exclusion status is simply called X or NX for short, after the commands and keywords of the same spelling, and you may see that in some messages.
Users of mainframe IBM ISPF are familiar with the look of an excluded line range, like this screen shot from an actual z/OS ISPF session:
EDIT MYLIB.TEST.DATA(ONE) - 01.30 Columns 00001 00072
Command ===> Scroll ===> HALF
****** ***************************** Top of Data ******************************
000001 LINE ONE
- - - - - - - - - - - - - - - - - - - 2 Line(s) not Displayed
000004 LINE FOUR
****** **************************** Bottom of Data ****************************
The dashed line is an excluded-line placeholder, something that simply indicates where the excluded lines are in the file, and how many of them are there. It also permits a line command to be entered in the sequence area of that placeholder line. Such line commands are normally of the “simple” type and not the “block” type.
Excluded lines and line-command usage
For example, if you wanted to delete excluded lines 2 and 3, you would not use DD or even D2 on the excluded-line placeholder sequence area, but just D. The reason you wouldn't use D2 is that the entire excluded range represented by the placeholder is treated as if one line, for purposes of the line command. If you had said D2 instead, what would happen is that you would delete lines 2 and 3 as a single unit, and then also delete line 4 as well.
If you like, you can think of D2 as deleting 2 units, where a unit is either a single displayed line, or an excluded-line placeholder (that may itself represent multiple lines). If you think of it this way, you will note that such a unit always takes up exactly one line visually in the edit display.
What if you had a lot of excluded and unexcluded lines interspersed together and you needed to delete several of them? How would you count all these units if you couldn't use the sequence numbers any more for that purpose? For all but the smallest examples, it would probably be too hard to count them, and that's where you would employ a DD block instead.
Wait a minute! Didn't we just say not to use DD? Well, yes and no. You wouldn't use DD to delete just the lines represented by the placeholder. But, you can use a DD block where excluded-lines placeholders are one or both of the ends of the DD block. When you do this, all the lines on the DD commands (whether excluded or not) as well as everything inside the DD block, are deleted.
If you wanted to shift all of the excluded line right by 4 columns, place )4 in the sequence area and press Enter; the block mode shift command )) would not be used.
In SPFLite, you don't have to worry about the dashed lines in the sequence area. These dashes, like line numbers in a normal line, instantly disappear the moment you start typing something into the sequence area.
Excluded-line placeholder display and the HIDE command
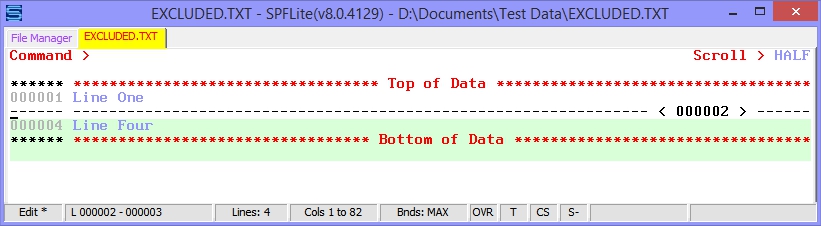
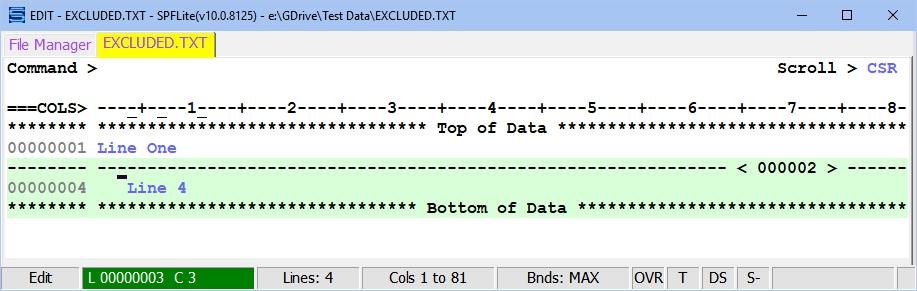
The ISPF version of the placeholder display is fine for new users unfamiliar with the concept of using excluded lines, and it looks good in a help document. Prior versions of SPFLite also used a similar display. But, once you get the hang of it, IBM's format is a little wordy and distracting, especially if you have a lot of them in a file. SPFLite now uses a new, streamlined format that dispenses with all these words. It provides just what is needed, and looks like this:
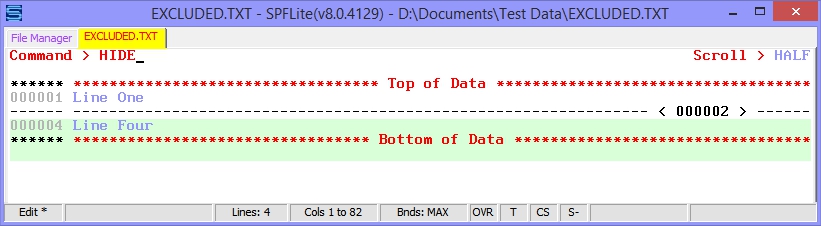
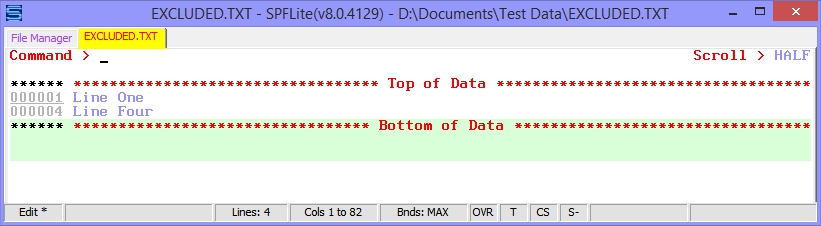
In some cases, even this brief format is too much. For that, you can use the HIDE command to collapse these excluded regions down to just an underline. IBM ISPF users familiar with this may be used to saying HIDE X. Since there is nothing else you can hide other than excluded lines, SPFLite does not support HIDE X as such, but instead uses HIDE ON and HIDE OFF. A plain HIDE means HIDE ON, and does the collapsing action. HIDE OFF or RESET HIDE will reverse this.
In order for HIDE to be most effective, the fixed-width font you use in SPFLite for editing needs to be capable of being underlined in a readable way. Courier New meets this requirement, as do fonts in the supplementary SPFLite fixed font library, such as Raster.
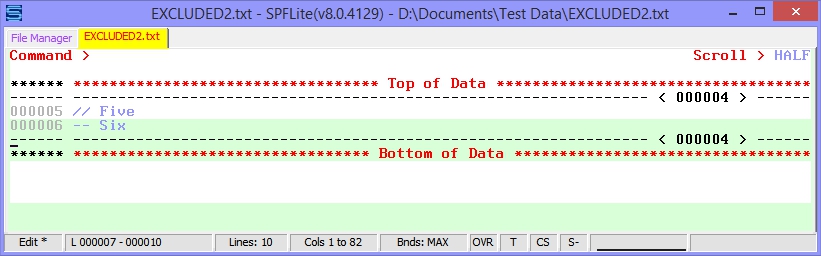
Example (before HIDE):
After HIDE:
Persistence of excluded lines and the STATE option
What “happens” to excluded lines? Nothing happens to the data, it just isn't displayed, and you don't lose any data when you save or close the file while lines are excluded. What about the fact that a line is excluded? Is that fact saved or lost once you close the file? In IBM ISPF, that information is lost. In SPFLite, this information can be retained, it depends on a PROFILE setting called STATE. See Edit STATE saving for a full description of State saving.
How do lines get excluded in the first place? There are several ways:
- The direct approach: Place X on a line, or place an XX/XX pair on a block of lines to exclude them. For an XX block, if there are any excluded lines already present within it, they will get merged together in one big excluded block. An XX line command can be put on a line which already displays the excluded-line placeholder; you would do that to make the excluded region even bigger than it already was.
- The TX or TXX line command can be used to 'toggle' the exclusion state of one or more lines. If the lines were previously unexcluded, they will be unexcluded; if the lines were previously excluded, they will be unexcluded. Lines in the range of a TX/TXX line command could be a mixture of excluded and unexcluded lines. Each line is handled individually.
- The X line command can take the form of Xn where n is a number of lines, or it may appear as X/ or X\ using the new / forward and \ backward modifiers.
- The EXCLUDE (X) primary command will exclude lines based on a search string, a line range, a tag name, a CC block, or it can exclude all lines.
- The NEXCLUDE (NX) primary command will exclude lines similar to EXCLUDE, but it works by excluding lines in which a search string is NOT found. For that reason, NEXCLUDE (NX) requires a search string to be specified, whereas in EXCLUDE (X) you can omit the string if desired.
- FIND and CHANGE (and related) primary commands can now accept a new keyword option of MX, which means make excluded. Any lines found in the course of processing a FIND MX or CHANGE MX will be made excluded.
- The “–” modifier on certain line commands can be used to exclude lines after the primary purpose of the line command is completed.
- The LINE primary command can be used to apply the X or XX line command to a range of lines.
Once a given line is excluded, how can it ever get unexcluded? Again, there are many ways:
- RESET EXCLUDED, RESET X or plain RESET will unexclude all lines (or just RES for short)
- The S line command will show (unexclude) a range of lines. If an S command is placed on an excluded-line placeholder, the entire region is unexcluded. S is the opposite of X and XX. The SPFLite S line command is a new use for this command name
.
- The TX or TXX line command can be used to 'toggle' the exclusion state of one or more lines. If the lines were previously unexcluded, they will be unexcluded; if the lines were previously excluded, they will be unexcluded. Lines in the range of a TX/TXX line command could be a mixture of excluded and unexcluded lines. Each line is handled individually.
- The SHOW and NSHOW primary commands will unexclude selected lines; these are the opposite of EXCLUDE and NEXCLUDE.
- When a FIND, CHANGE or similar primary command locates a search string on an excluded line, it will normally unexclude or “pop out” such lines
- The “+” modifier on certain line commands can be used to unexclude lines after the primary purpose of the line command is completed.
- To display just the first ‘n' or the last ‘n' lines in an excluded region, the F and L line commands are available.
Primary command options X and NX
Traditional ISPF allows for the options X or NX to be used on certain primary commands. X or NX on a command is used to decide which lines should be used or acted upon, based on their current exclusion status. A command FIND ABC ALL X will find all instances of the string ABC on excluded lines and report the number thereof, and FIND ABC ALL NX will only look at non-excluded lines. The X and NX options are allowed on these commands:
CHANGE
COMPRESS
CREATE
CUT
DELETE
FIND
FLIP
LC
LINE
NFIND
REPLACE
SC
SHOW
SORT
SUBMIT
TAG
TC
UC
X and NX are not allowed on the following commands. Either the command itself limits the scope of lines considered to only one type, or else it simply doesn't apply:
EXCLUDE only non-excluded lines considered
FLIP X|NX not supported
NEXCLUDE only non-excluded lines considered
NSHOW only excluded lines considered
RESET X|NX not supported
SHOW only excluded lines considered
Primary command options MX and DX
When a command such as FIND or CHANGE finds the requested search string on a line, and that line where the search string is found happens to be excluded, the standard action in ISPF is to unexclude that line. When this happens, those excluded lines are sometimes said to “pop out”, since visually, that's what it looks like when it happens.
Up until now, this standard action (to unexclude) was the only action available. With SPFLite, there are now two new possible actions that can take place.
Using the DX option (don't change exclusion), commands such as FIND or CHANGE will leave the exclusion status of found lines unchanged after the command completes. That means previously excluded lines will remain excluded, and previously unexcluded lines will remain unexcluded, even though the search string had been located.
Using the MX option (make excluded), when commands such as FIND or CHANGE locate their search string, will force the lines the string is found on to be excluded after the command completes, regardless of what their prior exclusion status was (excluded or not excluded).
The LOCATE command will accept an MX option if ALL is also specified, but it will not accept the DX option.
MX and DX should not be confused with X or NX. One way to think of these options is that X and NX affect which lines are selected beforehand to be inspected or changed, but MX and DX affect what is done with those lines afterwards. The distinction is important to understand, because X or NX can be combined with MX or DX on the same command.
Example: Changing all occurrences of ABC to DEF only on excluded lines, and then leaving them excluded, can be done with the command:
CHANGE ABC DEF ALL X DX
Users of the IBM ISPF have the ability to sort using excluded or non-excluded lines. When the SORT command completes, the sorted lines are successively stored back in a way that respects the excluded or unexcluded status of the original lines, in the same relative locations as previously occupied, but in a different order. This can be done even when the excluded or non-excluded lines are in non-contiguous locations.
This action, in which sorted lines are returned to non-contiguous locations, could be called storing those lines in a “scattered” or “interspersed” manner. It's a little unusual, and won't often be needed, but it can be useful at times.
In ISPF, when SORT is applied to excluded lines, the sorted lines remain excluded.
However, in SPFLite, the act of sorting excluded lines, and then storing them back, is considered a change. Since a change to a line, just like with the CHANGE command, defaults to unexcluding or “popping out” of excluded lines, this part of SPFLite's SORT behavior is not quite the same as in ISPF.
To get the same results in SPFLite when doing SORT X as ISPF produces, it is necessary to add DX when sorting these excluded lines. You must say SORT X DX to prevent the sorted lines from being unexcluded afterwards.
The consequences of FIND X DX and CHANGE X DX
Because the new exclusion options MX and DX are not available in standard ISPF, users may find themselves encountering a situation that never existed before on the mainframe. Recall that the standard action in ISPF is to unexclude an excluded line when found by a FIND or CHANGE. If you were to do such commands one at a time (repeating F5 or F6, for example), you would see lines “pop out” as they were found or changed, and the cursor would be successively placed on the line where this happened each time.
Now, suppose you have a group of excluded lines, and on each of them there is a string ABC which you are finding, or changing to DEF. And, for some reason, you want the lines not to pop out, but be left excluded, so you do this:
FIND ABC X DX
or
CHANGE ABC DEF X DX
That will do the job, alright, but after the first time, or the second time, etc. where is the cursor? Since the lines are still excluded, all you have is the excluded-line placeholder, that dashed line with the count of excluded lines. How are you supposed to keep track of the cursor?
SPFLite helps out here by continuing to display the line and column number at the bottom on the status line. When you issue commands like this, SPFLite realizes it has gotten within the “interior” of an excluded range.
This is something that traditional ISPF can't do, since, as soon as it finds something. it unexcludes it. ISPF can never be within the “interior” of a block of excluded lines, but SPFLite can.
When the cursor is in the interior of an excluded range, the line and column display is shown in reverse color, to remind you that something special is going on. In addition, you will see the visible cursor placed on the excluded-line placeholder line, in the same relative location it would have had, if the excluded lines had been visible.
Example: Let's say this is our original file, and we exclude lines 2 and 3. Here, we are going to indent the word LINE to emphasize what's happening. Notice line 1 starts in column 1; line 2 starts in column 2, etc.

Then, find the first occurrence of LINE in the excluded area:
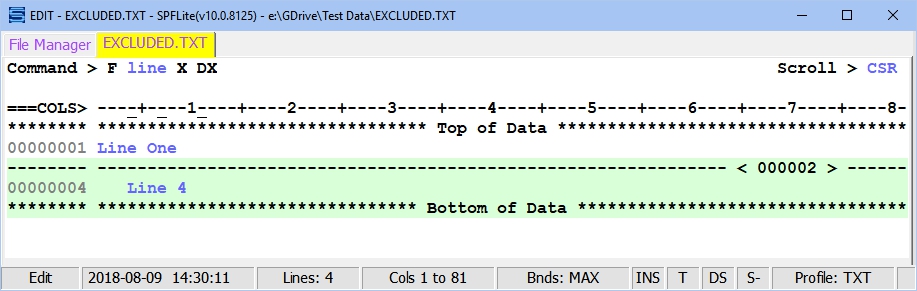
That's on line 2 – but we can't see line 2 right now. And because the FIND has a DX on it, line 2 is going to stay excluded. What will the display look like after you do the FIND command?

Notice the cursor is on column 2 of the placeholder. You will also see the Line/Column display on the status line showing the position of line 2, column 2, in reverse video, like this: L 000002 C 2 . If you press F5 to repeat the FIND, the cursor will advance to line 3, column 3, because that's where the next “LINE” is located:
And the Line/Column display on the status will now show L 000003 C 3 . A final F5 will result in “Bottom of data reached” because there are no more “LINE” strings that are excluded, and the Line/Column display will go back to its normal appearance.
What about FIND X DX or CHANGE X DX when the excluded lines are hidden as a result of the HIDE command? You can still do this, but because HIDE causes even the excluded-line placeholder to disappear, there is no “interim place” for the cursor to be displayed while you are successively going through the excluded lines, and the editor does not support this situation.
So, SPFLite will only allow you to use your FIND X DX or CHANGE X DX against hidden excluded lines if you specify ALL as part of the command. If you can't say FIND ALL X DX or CHANGE ALL X DX when HIDE is in effect, you will have to set HIDE OFF first.
The ‘–' post-exclude and ‘+' post-unexclude modifiers
If you move or copy one or more lines from one part of the file to another, and any of those lines were originally excluded, they stay excluded afterwards. So, moving and copying lines does not normally change their exclusion status. Suppose you did want to change the exclusion status of these lines. Let's say you are ‘gathering' blocks of lines from several places in a file and placing the copied lines at some point. As you continue this copying process, the copied lines will take up more and more ‘space' in the file, and you will have to scroll through or scroll past them as you continue working. Eventually all those lines will start “getting in your way”. It would be convenient if you could tell the editor, ‘just exclude the copied lines for right now; I'll get back to them later'. How could you do it?
For sake of discussion, we will assume that you are going to copy lines using CC/CC and an A command. Suppose you had a file like this, and are copying lines as shown:
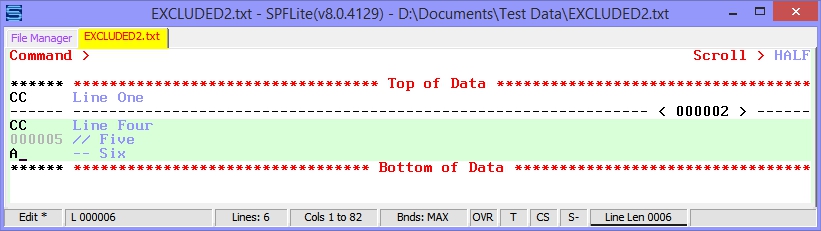
When you are done, the file display will look like this:
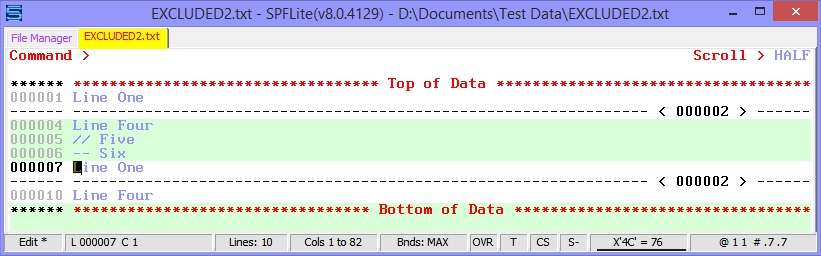
Lines 1-4 have been copied and are now lines 7-10. The copies of originally excluded lines 2-3 remain excluded as lines 8-9. If you wanted lines 7-10 “all one way”, you could now go back and manually exclude them with an XX line command, or you could manually unexclude them with an S line command, or you could use the primary command equivalents of these. But suppose you didn't want to do that – you just wanted your newly copied lines to already be in a certain exclusion state “right off the bat”. Here's where the “+” and “–” modifiers come into play. Let's say you want all your copied lines to be excluded right when the copy is done. This is easily done by placing a minus after the A command:

When you are done, the file display will look like this. Notice that the copied lines are immediately excluded for you, so you don't have to go back and do it yourself manually. You can continue this process until you've copied everything you need, and then go back and unexclude them later and do further editing when it's more convenient.
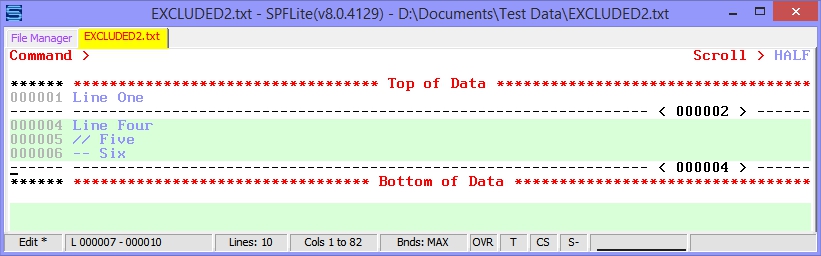
The minus (or plus) could be on the CC as well. What that does is exclude (or unexclude) the block of source lines after the copy operation is completed. That happens independently of what happens to the target lines copied after the A–.

When you are done, the file display will look like this:
Likewise, the + can be used to unexclude lines being copied or moved. The Before command B can accept a + or – in the same way A can.
Like anything else you would do with a block command, if you have some modifier or number on a block, you can put the modifier on one end, or on the other end, or on both ends, but if you use both they must agree. You can't have a CC+ matched with a CC– and not expect SPFLite to complain.
Line commands like D and M don't take + and – modifiers, because that would be asking the editor to delete a line and then go back and exclude or unexclude a line that no longer exists. (SPFLite is good, but it's not that good.) You can use an ordinary M/MM block and move it using A+, A–, B+ or B–, but the M/MM can't use the + or – itself.
Primary command examples
In order to get a feel for how the various primary commands operate under the control of excluded lines, here are a number of examples, with commentary as to what the commands mean and what they would accomplish. These examples will not show every possible feature of every command, but only those that relate to how they interact with excluded lines.
The examples will generally show the use of the ALL option. Many of these commands will have other options for selecting lines, such as a line label, a line-label range, line tags and CC or MM blocks. Line tags and CC or MM blocks are new features that are explained in another section. For clarity, the full names of commands are shown, like FIND and CHANGE, whereas in practice people normally use the abbreviations like F and C, which are shown in parentheses.
LOCATE ALL LABEL
Find all occurrences of labeled lines, and as a side-effect, unexclude all of them. When ALL is used on LOCATE, no particular line is located.
LOCATE ALL LABEL MX
Find all occurrences of labeled lines, and as a side-effect, make all of them excluded. When ALL is used on LOCATE, no particular line is located.
The LOCATE ALL handling of excluded lines is described here.
FIND (F):
FIND ALL ABC X
Find all occurrences of ABC within excluded lines. Each excluded line having ABC is unexcluded and “pops out” of the display. When ALL is used, a count of strings is displayed. Lines already unexcluded remain unexcluded, but they are not looked at for purposes of determining the count.
FIND ALL ABC X DX
Find all occurrences of ABC within excluded lines. Each excluded line having ABC remains excluded afterwards.
FIND ALL ABC NX
Find all occurrences of ABC within unexcluded lines. Each unexcluded line having ABC remains unexcluded. When ALL is used, a count of strings is displayed. Any excluded lines remain excluded, and they are not looked at for purposes of determining the count.
FIND ALL ABC NX MX
Find all occurrences of ABC within unexcluded lines. Each unexcluded line having ABC will be newly excluded. When ALL is used, a count of strings is displayed. Any formerly excluded lines remain excluded, and they are not looked at for purposes of determining the count.
NFIND (NF):
NFIND ALL ABC X
Find all excluded lines in which ABC is NOT found. Each excluded line NOT having ABC is unexcluded and “pops out” of the display. When ALL is used, a count of lines is displayed. (The count is a count of lines, not strings, because we are finding lines where the string is NOT there. The lines exist, but the strings don't, so we can't very well count something that doesn't exist!) Lines already unexcluded remain unexcluded, and they are not looked at for purposes of determining the count.
NFIND ALL ABC X DX
Find all excluded lines in which ABC is NOT found. Each excluded line NOT having ABC remains excluded afterwards.
NFIND ALL ABC NX
Find all unexcluded lines in which ABC is NOT found. Each unexcluded line NOT having ABC remains unexcluded. When ALL is used, a count of lines is displayed. Any excluded lines remain excluded, but they are not looked at for purposes of determining the count.
NFIND ALL ABC NX MX
Find all unexcluded lines in which ABC is NOT found. Each unexcluded line NOT having ABC will be newly excluded. When ALL is used, a count of lines is displayed. Any formerly excluded lines remain excluded, and they are not looked at for purposes of determining the count.
CHANGE (C):
CHANGE ALL ABC DEF X
Find all occurrences of ABC within excluded lines, and change ABC to DEF. Each excluded line having ABC is unexcluded and “pops out” of the display. When ALL is used, a count of strings is displayed. Lines already unexcluded remain unexcluded, but they are not looked at for purposes of determining the count.
CHANGE ALL ABC DEF X DX
Find all occurrences of ABC within excluded lines, and change ABC to DEF. Each excluded line having ABC remains excluded afterwards.
CHANGE ALL ABC DEF NX
Find all occurrences of ABC within unexcluded lines, and change ABC to DEF. Each unexcluded line having ABC remains unexcluded. When ALL is used, a count of strings is displayed. Any excluded lines remain excluded, but they are not looked at for purposes of determining the count.
CHANGE ALL ABC DEF MX
Find all occurrences of ABC within unexcluded lines, and change ABC to DEF. Each unexcluded line having ABC will be newly excluded. When ALL is used, a count of strings is displayed. Any formerly excluded lines remain excluded, but they are not looked at for purposes of determining the count.
EXCLUDE (X):
EXCLUDE ALL
Exclude every line in the file.
EXCLUDE ALL ‘ABC' WORD
Exclude all lines having the word ‘ABC'
NEXCLUDE (NX): (requires a search string)
NEXCLUDE ‘ABC' ALL
Excludes all lines NOT having ABC somewhere on the line. If you begin with no exclusions, like after a RESET is issued, and then issue NX ABC ALL, only those lines containing ABC will be visible, and everything else will be excluded. Some editors refer to this capability as an ‘ONLY' function.
Note that for NEXCLUDE, the string operand is required. (Otherwise, you'd be asking SPFLite to exclude all lines in which “nothing” is not present, which doesn't make sense.)
Tritus SPF users will recognize the NX command.
SHOW:
SHOW ALL
Unexcludes all lines in the file or in a CC block. This performs the same function as a RESET command, except that SHOW respects CC blocks.
SHOW ‘ABC' WORD ALL
Unexcludes all excluded lines in the file or in a CC block which contain the word ‘ABC'.
SHOW ‘ABC' PREFIX .A .B
Unexcludes all excluded lines in range of .A .B which contain the prefix ‘ABC'.
NSHOW: (requires a search string)
NSHOW ‘ABC' WORD ALL
Unexcludes all excluded lines in the file or in a CC block which do NOT contain the word ‘ABC'.
NSHOW ‘ABC' PREFIX .A .B
Unexcludes all excluded lines in range of .A .B which do NOT contain the prefix ‘ABC'.
UC, LC, SC, TC:
These four commands all modify the alphabetic case of one or more lines in some way. Since they are so similar, they are discussed together, using UC as an example. These commands change text, so they all will unexclude lines by default.
UC ALL X
Convert all excluded lines in the file or in a CC block to upper case, and then unexclude them.
UC ALL X DX
Convert all excluded lines in the file or in a CC block to upper case, and leave them excluded.
UC ALL NX
Convert all unexcluded lines in the file or in a CC block to upper case, and leave them unexcluded.
UC ALL NX MX
Convert all unexcluded lines in the file or in a CC block to upper case, and then exclude them.
CREATE (CRE):
REPLACE (REP):
CREATE file-name X
CREATE file-name NX
REPLACE file-name X
REPLACE file-name NX
REPLACE will overwrite an existing file, whereas CREATE will not; otherwise these two commands work the same way. (However, REPLACE cannot be used to write over the file you are currently editing.) CREATE and REPLACE can select their source data from among excluded or non-excluded lines using the X or NX option. The source lines may be come from a line-label range, a tag name, or a CC or MM block.
COPY:
The COPY command doesn't take X, NX, MX or DX. However, if you can use the A– or B– line commands so that the copied lines will be excluded afterwards. It is legal to use the A+ or B+ commands instead, but lines copied from an external file are normally inserted as unexcluded, so adding + would not change anything.
CUT X:
CUT NX:
CUT can select its source data from among excluded or non-excluded lines using the X or NX option. The source lines may be come from a line-label range, a tag name, or a CC or MM block.
DELETE (DEL):
ISPF, prior versions of SPFLite, and other SPF-style editors such as Tritus SPF all handled the DELETE primary command somewhat differently.
For some of the operands of DELETE, such as X and NX, the ALL option previously was implied but not allowed by SPFLite, but was required by other editors. For others, ALL was not implied and it had to be present. For a simple DELETE ALL, the command was illegal. SPFLite has simplified these rules as follows.
- In most cases, the ALL keyword is optional. That means to delete all excluded lines, you may say either DELETE ALL X or just DELETE X. Either one is legal, and either one does exactly the same thing. So, long-time users of SPF-style editors that required DEL ALL X can keep typing it.
- It is important to remember that ALL lines that meet the criteria provided to the DELETE command will be deleted, whether the ALL keyword is used or not.
- If you wish to delete every line in the file, DELETE ALL is now a legal command. Be aware that every line in the entire file WILL be deleted, so issue this command with care ! There is no “are you sure” message to confirm a DELETE ALL. If you do a DELETE ALL by mistake, issue the UNDO command immediately, and the file will be restored.
- As a safeguard, DELETE ALL cannot be abbreviated as DEL ALL. Since most users always type the shortest form of a command to save time, DEL ALL with no other operands will be treated as an unintended deletion of the entire file. If you attempt this, the command will be rejected and you will be reminded to fully spell out DELETE ALL if that is your intent.
- A plain DELETE with no other operands is not permitted.
PRINT X :
PRINT NX:
PRINT can select its source data from among excluded or non-excluded lines using the X or NX option. The source lines may be come from a line-label range, a tag name, or a CC or MM block.
FLIP:
The FLIP primary command will invert the exclusion status of a specified range of selected lines or of all the lines in the file. Excluded will become unexcluded, and vice-versa. If the range is omitted, the entire file is “flipped”. What is notable about SPFLite is that FLIP will take a CC block to define its range, in addition to a label range.
RESET (RES):
RESET EXCLUDED will unexclude all excluded line. Since this is the default action, everyone just says RES instead of spelling out the whole command.
SORT: (see also the section Using SORT X for more information)
SORT X
Excluded lines only are sorted, and returned as unexcluded lines to the same set of line locations, except in sorted order.
SORT X DX
Excluded lines only are sorted, and returned as excluded lines to the same set of line locations, except in sorted order.
SORT NX
Unexcluded lines only are sorted, and returned as unexcluded lines to the same set of line locations, except in sorted order.
SORT NX MX
Unexcluded lines only are sorted, and returned as excluded lines to the same set of line locations, except in sorted order.
RESET (RES):
ISPF provides RESET to reset a number of “special” line conditions, such as changed-line markers, profile lines, and excluded lines. If you want to clear your line exclusions, most people just type RES on the command line. Doing so will not reset any labels that might be present. In SPFLite, RESET works basically the same way, but since you now have the possibility of labels, tags and kept line commands, when you really need to reset a number of kinds of special lines, you would ordinarily need several RESET commands. A regular RESET without any options does not reset labels, tags or kept commands.
To allow everything to be cleared at one time, SPFLite provides RESET ALL. This command will reset everything that is possible to reset, including excluded lines, labels, tags, kept line commands, lines with special indicators like ==CHG> and the lines displayed in response to a PROFILE command.
Created with the Personal Edition of HelpNDoc: Experience the Power and Simplicity of HelpNDoc's User Interface