Power Typing Mode
Contents of Article
Basic concepts of Power Typing
Support for LEFT and RIGHT scrolling in Power Typing mode
Basic features available in Power Typing mode
Detailed list of keyboard primitive functions allowed in Power Typing mode
Example 2: Right justifying data
Example 3: Appending a string to a column of varying data
Introduction
Power Typing is an editing facility in which, for each character you type, or each keyboard primitive function you use, the character is typed or the function is applied to every line in the Power Typing line range, in parallel, all at the same time. Every editing action you take is replicated on every line.
Some editors refer to this capability as “column-mode editing” because the same action is applied at the same column position of every line at the same time, in parallel. You will generally find the editing capabilities of SPFLite's Power Typing to be more powerful than the “column mode” features of other editors, because the line range and X|NX options allow for the selection of non-contiguous lines, and because of the wide range of keyboard functions you can use while you are within Power Typing mode.
You begin a Power Typing session with the PTYPE command, using the lines you specify in the line-range operand or C/CC block, which can be limited to just excluded (X) or just non-excluded (NX) lines if you wish. (See the description of PTYPE for more information.)
Once Power Typing mode begins, the edit display moves to the first line of the selected line range, in the same way a LOCATE command would do. You will see the message, Entering Power Type mode, Press Enter to exit, and the status line will show .PowerType.
The cursor is then moved to column 1 of that first line, which then acts as a ‘prototype' or ‘model line'. The concept of the ‘model line' is especially important for certain aspects of Power Typing, such as highlighting and enumerations.
As you enter characters keys or invoke keyboard functions, you will see the effects reflected on the model line, and on every other line that is included in the Power Typing line range.
Power Typing mode remains in effect until you press Enter. Once that is done, the message Entering Power Type mode, Press Enter to exit will disappear, and the status line indicator showing .PowerType. will be removed as well.
Note 1: Power Typing mode is allowed while within a multi-edit session.
Note 2: Keyboard Recording is allowed during Power Typing. However, since the status indicator is already showing .PowerType., the usual message of .KB Recording. will not appear. However, keyboard recording will still proceed as usual. When you press the key mapped to (Record), which by default is the Scroll Lock key, you will see the SPFLite KeyMap dialog will appear. When you exit from KeyMap, Power Typing continues in effect. You can immediately use any keys you have added or changed in KeyMap in your resumed Power Typing session.
Basic concepts of Power Typing
When you are Power Typing, conceptually you are typing on one line – the top line of the line range you selected when you issued the PTYPE command. This top line is called the prototype or model line. As you type on or edit the model line, every character you type and every editing action you take is duplicated on every other line in the line range at the same time, in parallel.
Since the design of Power Typing is based on the ‘model line' approach, you are constrained to focus your editing activities on this first ‘model line' even though the changes you make to it are propagated to every other line you are working with. Because of this, when you are in Power Typing mode, certain keystrokes, commands and editing features are not available:
Because you cannot use line command or primary commands, much of the power of Power Typing comes from the extensive list of keyboard primitive functions that are allowed in Power Typing mode, which include almost all of the functions allowed during ordinary editing. If any of those functions provide editing you might wish to use during Power Typing, be sure to KEYMAP them to key combinations of your choice, so you'll have them at hand and ready to use when you being a Power Typing session.
Note: Because the keyboard functions are a major source of Power Typing's power, that's a good reason why you should invest the time to understand how keyboard functions and key mapping operate, to get the most benefit out of Power Typing. The dividends you'll receive by doing so will make the learning curve is well worth it.
See the Power Typing examples at the end of this article for more information.
When the PTYPE command is issued, there is an implied multi-line cursor in effect, since all editing actions that take place on the top (model) line are replicated on every line that is within the PTYPE line range. A set of vertical lines, one on each side of the real cursor will appear, starting from the real cursor itself to the last line of the PTYPE line range. These lines are displayed using the same graphics used for MARK lines, and in the selected MARK color. This makes the point of editing activity on each line plainly visible. All of the screen shots in this section have been revised to show these new multi-line cursors.
Support for LEFT and RIGHT scrolling in Power Typing mode
If you wish to scroll the file left or right while Power Typing, you can use the left and right arrows. Even though SPFLite in general does not allow primary commands to be executed while Power Typing, special support has been added so you can use keys that are mapped to the primary commands LEFT and RIGHT to accomplish this. Most users will have these keys mapped to F10 for LEFT and F11 for RIGHT. You cannot enter these actual commands while Power Typing, because you cannot move the cursor to the primary command area. But, you can type a mapped key, like F10 or F11, to do this. When this is done, SPFLite will respect the current Scroll amount displayed in the upper-right corner of the screen.
Basic features available in Power Typing mode
You can do the following basic activities in Power Typing mode, assuming you have typical key mappings set up, most of which you will already have available by default:
- Enter ordinary text, including special characters assigned in KEYMAP
- Move the cursor left and right
- Move the cursor to the beginning or end of the line
- Delete characters with DEL or Backspace key
- Erase to end of line
- Highlight text
- Delete highlighted text via the DEL or Backspace key
- Replace highlighted text with new text, with or without the INS mode being on
You can also justify highlighted text (left, right or centered) and enumerate highlighted text as decimal or hex numbers. These functions do not have default key mappings.
Detailed list of keyboard primitive functions allowed in Power Typing mode
You can use the following keyboard functions while you are in Power Typing mode. A brief description of the effect of each function is provided. Any keyboard function that involves a clipboard can reference a Named Private Clipboard. For example, if you have a Named Private Clipboard of myclip, you can paste data from it during a Power Typing session with a function of (Paste/myclip)
(Backspace)
Moves cursor left one column on the top (model) line, then deletes the character at that position on every line.
(BackTab)
Moves cursor to prior tab position on the top (model) line.
(ClipDate)
Stores date string, in Windows-defined format, into the clipboard.
(ClipIsoDate)
Stores date string, in format YYYY-MM-DD, into the clipboard.
(ClipIsoTime)
Stores time string, in format HH:MM:SS, into the clipboard.
(ClipName)
Stores the basic file name of the edit file into the clipboard.
(ClipPath)
Stores the fully-qua file name of the edit file into the clipboard.
(ClipTime)
Stores time string, in Windows-defined format, into the clipboard.
(Copy)
Copy highlighted text from the top (model) line into the clipboard.
(CopyPaste)
If there is currently highlighted text on the top (model) line, it performs a (Copy) operation. If there is no current highlighted text, it performs a (Paste) operation, storing the pasted text on every line beginning at the column where the cursor is located on the top (model) line.
(Cut)
If there is currently highlighted text on the top (model) line, this will copy it to the Clipboard and will delete the selected characters from the top line, and from the same corresponding positions on every line. For example, if the highlighted text is in columns 1-5 on the top line, the text going to the clipboard comes from columns 1-5 of the top line, and columns 1-5 are deleted from every line. Characters to the right on each line are shifted left.
(Date)
The current date, in Windows-defined format, is stored into every line at the current cursor location.
(Delete)
The character at the current cursor location is deleted from every line. If there is currently highlighted text on the top (model) line, characters in the same corresponding positions are deleted on every line.
(EndOfLine)
Move the cursor to 1 character past the current end of the top (model) line. If the top (model) line contains trailing blanks, the cursor is placed after the last blank of that line.
(EndOfText)
Move the cursor to 1 character past the last non-blank character in the top (model) line.
(Enum)
Enumerate (create sequence numbers) on each line of the Power Typing line range. There must be a highlighted field on the top (model) line, which holds the starting value and format information. (Enum) creates sequence numbers in decimal. To successfully enumerate a range of lines, Power Typing must be active, a highlighted field must be present, and an initial value with optional formatting, are required. See Working With Enumerations for more information.
(EnumHexLc)
Enumerate (create sequence numbers) on each line of the Power Typing line range. There must be a highlighted field on the top (model) line, which holds the starting value and format information. (EnumHexLc) creates sequence numbers in hex, and where hex numbers contain digits greater than 9, the digits will be formatted as a‑f in Lower Case. To successfully enumerate a range of lines, Power Typing must be active, a highlighted field must be present, and an initial value with optional formatting, are required. See Working With Enumerations for more information.
(EnumHexUc)
Enumerate (create sequence numbers) on each line of the Power Typing line range. There must be a highlighted field on the top (model) line, which holds the starting value and format information. (EnumHexUc) creates sequence numbers in hex, and where hex numbers contain digits greater than 9, the digits will be formatted as A‑F in Upper Case. To successfully enumerate a range of lines, Power Typing must be active, a highlighted field must be present, and an initial value with optional formatting, are required. See Working With Enumerations for more information.
(Erase)
Will replace all highlighted characters with an equal number of spaces, on the top (model) line, and every other line in the the Power Typing range in the same columns. It is an error to attempt to use (Erase) if no highlighting is present.
(EraseEol)
Will erase (delete) all characters from the cursor location to the end of line, including the character at the cursor location, on every line.
(Insert)
Will toggle the current Insert/Overtype status. The current status is always displayed in the status line.
(IsoDate)
Will paste the current date, in ISO format, into the text at the current cursor location, on every line. ISO date format is YYYY-MM-DD.
(IsoTime)
Will paste the current time, in ISO format, into the text at the current cursor location, on every line. ISO time format is HH:MM:SS, 24 hr clock.
(JustifyC)
Text justification requires highlighted text on the top (model) line. The highlighted field defines a column range used during the text justification. (JustifyC) will center the text in the middle of the column range, on every line. Where an odd number of characters are involved in centering, there will be one more character on the right side of center than on the left side of center.
(JustifyL)
Text justification requires highlighted text on the top (model) line. The highlighted field defines a column range used during the text justification. (JustifyL) will left-justify the text within the column range, on every line.
(JustifyR)
Text justification requires highlighted text on the top (model) line. The highlighted field defines a column range used during the text justification. (JustifyR) will right-justify the text within the column range, on every line.
(LastTab)
Will move the cursor to the last defined tab in the Tabs line, if Tabs are currently active. If the last tab code on the Tabs line is a + plus sign, that is where the cursor will be positioned.
(Left)
Will move the cursor one character to the left.
(Lift)
Will copy all highlighted characters into the clipboard and then replace them with an equal number of spaces. Thus, the function is used to "lift" characters off the screen without the surrounding characters moving in any way. It is an error to attempt to use (Lift) if no characters are currently highlighted.
(LowerCase)
If there is currently highlighted text on the top (model) line, the highlighted field defines a column range used during the operation. (LowerCase) will convert text to lower case within the column range, on every line.
(MarkEnd)
Will move the cursor to the last text character on the top (model) line in text selection mode. If selection mode is not already set, it will turn on mark mode and highlight the text from the current cursor location to the last text character on the top (model) line, and on the same corresponding columns on every line.
(MarkLeft)
Will move the cursor left one character on the top (model) line in text selection mode. If selection mode is not already set, it will turn on mark mode and highlight the current cursor location on the top (model) line, and on the same corresponding columns on every line.
(MarkRight)
Will move the cursor right one character on the top (model) line in text selection mode. If mark selection is not already set, it will turn on mark mode and highlight the current cursor location on the top (model) line, and on the same corresponding columns on every line.
(Paste)
Will paste the current Clipboard contents at the current cursor location, and on the same corresponding columns on every line. If the Clipboard contains multiple text lines, only the first line in the clipboard is used. The same string value is pasted into every line.
(Pen/colorname)
(Pen/STD)
If selected columns have been marked, the appropriate hilight color will be set in those column throughout the entire PT range. Only existing columns will be colored. i.e. a line will NOT be extended with blanks just to be colored.
There must be currently highlighted text on the top (model) line. The highlighted field defines a column range used during the copy operation. The range of columns are copied to the clipboard from every line, as an array of individual string values. The format of the clipboard data is one text line per field copied, one per line in the Power Typing line range. That means you can paste the clipboard data from (PowerCopy), as a list of lines, into any Windows application using standard paste commands, such as Ctrl-V in NotePad.
This function operates the same way as (PowerCopy), except that the characters in the column range are deleted after being copied into the clipboard.
The function requires that the clipboard contain one or more lines of text; these lines need not be of the same length. The lines of text are pasted left-justified starting at the column where the cursor is on the top (model) line. If there are more lines in the clipboard than lines in the Power Typing line range, the extra lines in the clipboard are not used. If there are more lines in the Power Typing line range than lines in the clipboard, the extra lines in the Power Typing line range are unchanged. If Insert Mode is on, data for each line in the clipboard pushes over the existing data on each line, and this data is inserted one line at a time, even when the lines in the clipboard are of differing lengths.
(ResetInsert)
Saves the current setting of Insert Mode (for possible later use by RestoreInsert), and then turns Insert Mode off.
(RestoreCursor)
Will restore the column position of the cursor from a prior (SaveCursor) function. When (SaveCursor) and (RestoreCursor) are using in Power Typing mode, they should be used together. No attempt should be made to save the cursor outside of Power Typing mode and then restore it while Power Typing is active, or vice-versa.
(RestoreInsert)
Sets the Insert Mode to whatever it was (on or off) before the most reset (SetInsert) or (ResetInsert) was done. If neither function has been done since SPFLite was started, (RestoreInsert) has no effect.
(Right)
Will move the cursor one character to the right.
(SaveCursor)
Will save the column position of the cursor, to be restored later by a (RestoreCursor) function.
(SentenceCase)
If there is currently highlighted text on the top (model) line, the highlighted field defines a column range used during the operation. (SentenceCase) will convert the first letter of the first word to upper case within the column range, and all other letters are converted to lower case, on every line.
(SetInsert)
Saves the current setting of Insert Mode (for possible later use by RestoreInsert), and then turns Insert Mode on.
(ScrollLeft)
Scrolls the screen to the left. The cursor remains in its current location.
(ScrollRight)
Scrolls the screen to the left. The cursor remains in its current location.
(Swap)
Will swap two areas marked on the model line in each PowerType line.
(Tab)
Will move the cursor to the next tab stop if in the text area and Tabs are active. In Power Typing mode, (Tab) will never move the cursor off the top (model) line.
(Time)
Will paste the current time into the text at the current cursor location, on every line. Format is HH:MM:SS AM. 12 hour clock with trailing AM/PM.
(TitleCase)
If there is currently highlighted text on the top (model) line, the highlighted field defines a column range used during the operation. (TitleCase) will convert text to title case (capitalizing the first letter of every word, and lower-casing the rest of each word) within the column range, on every line.
(ToggleHome)
Based upon the contents of the top (model) line, if the cursor it at column 1, it will get repositioned to the left-most non-blank of the line; if not at column 1, it will get repositioned to column 1; if the line is blank, it will always position the cursor to column 1.
(TxtHome)
Will move the cursor to column 1 of the text data.
(UpperCase)
If there is currently highlighted text on the top (model) line, the highlighted field defines a column range used during the operation. (UpperCase) will convert text to upper case within the column range, on every line.
(WordLeft)
Will move the cursor left to the beginning of the current word (if within a word) or to the beginning of the previous word if already at the beginning of a word. Cursor will never move off the current line.
(WordRight)
Will move the cursor left to the beginning of the next word Cursor will never move off the current line.
Because Power Typing is a very dynamic process, it can be hard to capture the ‘feel' of it in a static Help document such as this, but we will do our best.
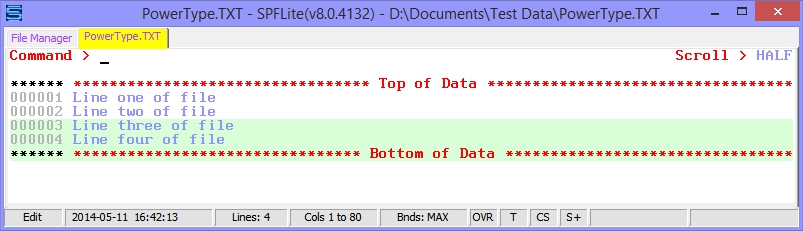
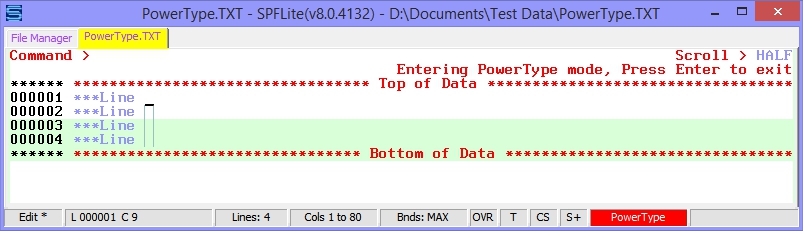
Let's start with a small file:
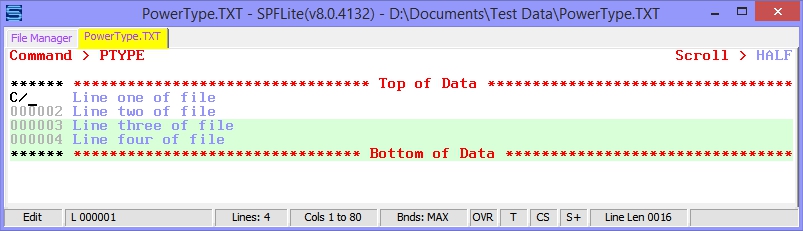
There are a number of ways of starting Power Typing mode on this file. Here is one using a C/ line command:
After you press Enter, you will see the Power Typing message and the .PowerType. indicator on the status line:
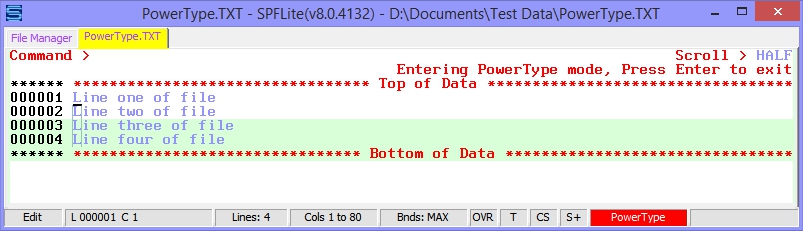
Notice that all the data lines are now highlighted. That tells you which lines are involved in the Power Typing session. This issue becomes more important if those lines are non-contiguous, such as if less than the whole file is involved, if you said X or NX on the PTYPE command, or if you used tags to select a non-contiguous set of lines, etc. Since we chose the whole file, the top (model) line is line 1.
Notice also the cursor is at column 1 of line 1, and the implied cursor is visibly shown with the vertical lines extending downward from the real cursor. That is the point where all data is going to be entered on every line.
Keep in mind that you will stay in Power Typing mode until you press the Enter key.
When you enter Power Typing mode, you will be placed in Overtype mode (OVR will appear on the status line) even if it had been INS mode prior to starting PTYPE mode. Now, set Insert Mode on, and type the * key three times. You will see this:
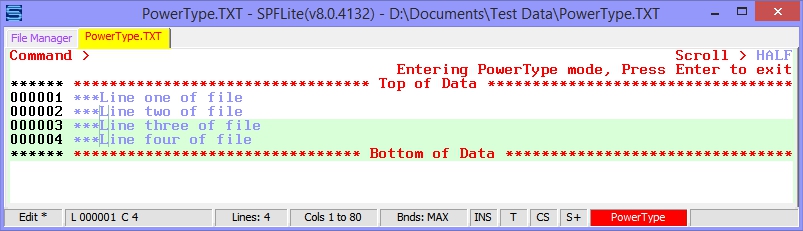
The *** is inserted into every line at the same time. Now, turn Insert Mode off. Suppose we want to change the lines so that the “one, two, three, four” is replaced by a sequential 3-digit number (an enumeration) starting with 501. First, move the cursor to column 9 and press the key mapped to Erase to End of Line, normally mapped to the ESC key. You will see all the text from column 9 onward is erased on every line:
Next, replace the former variable-length text with a fixed-length string that includes the starting number.
You will type in the string, 501 of the file. You type this string just once, and as you do, the text gets replicated on every line, at the same time:

Now, highlight the number 501 on the first line (as you will recall, the first line is the only one you can operate on). You can use the mouse or the keyboard (using arrow keys mapped to ‘mark' keyboard functions) to do the highlighting.
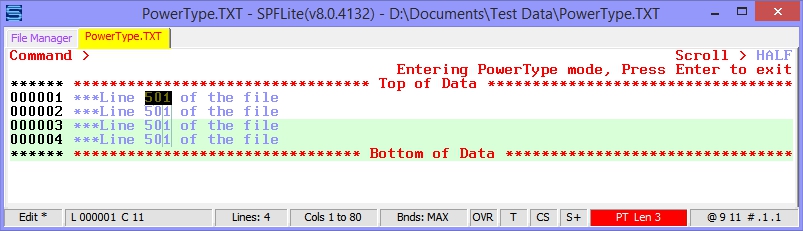
To complete the enumeration, you would type a key mapped to the (Enum) function. Suppose you mapped Ctrl-E to do this prior to beginning your Power Typing session. Assuming you have, type Ctrl-E now. The enumeration will be done on every line, at the same time, and you will see this:

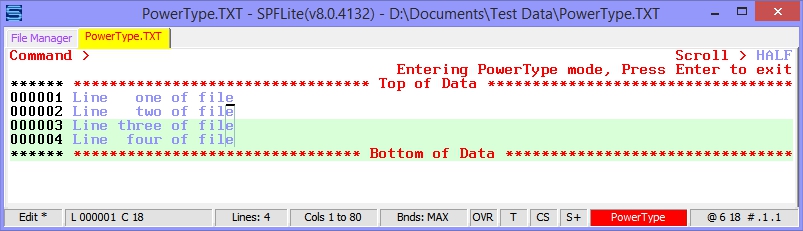
Example 2: Right justifying data
As another example, let's go back to the original data:

We will highlight columns 6 through 18 to cover the variable-length part of these lines:

For sake of discussion, we will assume that the Justify functions are assigned as:
Ctrl-Shift [ = (JustifyL)
Ctrl-Shift ] = (JustifyR)
Ctrl-Shift \ = (JustifyC)
There are no installation defaults for the Justify functions, but you can make these anything you wish, of course.
Assuming you have your keys mapped that way, press Ctrl Shift ] now.
This will right-justify the text on every line, in columns 6 through 18. Once done, you will see the text justified on each line:
If you highlighted the same columns and pressed a key mapped to (UpperCase) it would convert those columns to upper case on every line, at the same time:

These are just a few examples of what is possible with Power Typing. You will also find the Power Copy, Power Cut and Power Paste functions to be especially useful. Once you have finished, just press the Enter key, and you will return to normal editing.
Example 3: Appending a string to a column of varying data
The APPEND primary command can be used to append a string to the end of multiple lines of varying lengths. For example, you could put a period at the end of a group of sentences between labels .A and .B by the command APPEND '.' .A .B ALL. But suppose you had a column of values and you needed to add some value to the end of each item, but the items were in the middle of the line rather than at the end. How could you do it? Assuming all of the column of values are left-justified to begin with, you can use Power Typing to achieve this.
To do this, you will need to map the text-justification functions to keys to make them available. For sake of discussion, let's again assume the following key mappings are in place. As usual, these are not defaults, and you would have to map these keys yourself.
Ctrl-Shift [ = (JustifyL)
Ctrl-Shift ] = (JustifyR)
Ctrl-Shift \ = (JustifyC)
Now, let's make a file, similar to the one above, with some data we need to modify, and we will enter Power Typing mode:

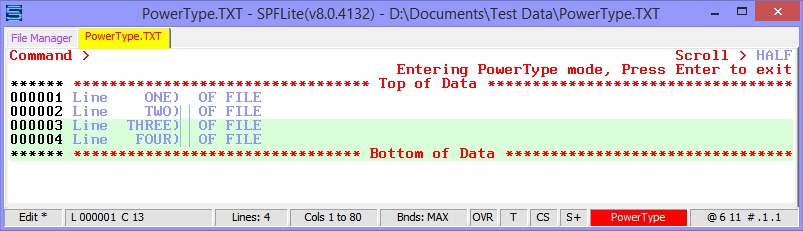
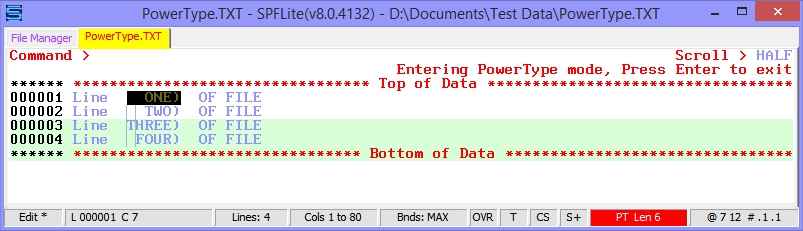
Suppose the task is to put parentheses around each of the words ONE, TWO, THREE and FOUR. Since these words are of varying lengths, how do we do it? First, highlight the columns over the words, so that the highlighting covers the longest word, which in this case is the five letters of the word THREE, and then one extra column. Notice that the status line shows PT Len 6, an indication that you are still in Power Typing mode and you highlighted a string of length 6.
This gives us:

Now, noting the keys you mapped above, right-justify the column of text:

Move the cursor to column 12 and type a right parenthesis:
Highlight the columns again as shown here:
Again, noting the keys you mapped above, left-justify the column of text:

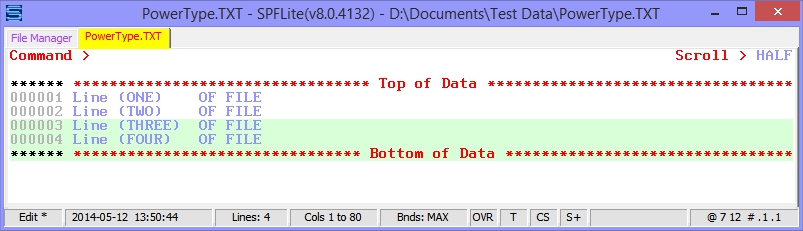
Finally, move the cursor to column 6, type a left parenthesis, then press Enter to end Power Typing mode. Result:
Created with the Personal Edition of HelpNDoc: Create Professional CHM Help Files with HelpNDoc's Easy-to-Use Tool