File Manager
Contents of Article
Example of File Manager display
User Specified QuickList Entries
Managing STANDARD and ALTERNATE Column Layouts
Specifying the criteria for directory displays
Changing the file display order
Introduction
The SPFLite File Manager is designed to provide a powerful, easy-to-use interface for file selection and file management. This includes a wide range of capabilities to manage file operations, and support for File Lists (collections of files) to provide quick access to frequently used files and directories.
Note: The file extension of a File List file is .FLIST. When speaking informally about one or more of such lists, we use the more conversational phrase "File List" or "File Lists".
File Manager features:
- A variety of predefined File Lists: Recent Files, Favorite Files, Open Files, Found Lists, Recent Paths and Config Lists.
- Directory path lists, both single folder and full recursive path searches.
- Extensive File Pattern matching can be used on the file names to display only wanted files.
- Large scrollable line-command field can be used to enter long line-command names, or commands with arguments (like Add and Rename). This field is padded with _ characters. Note that if the File/Path being displayed is flagged as Read-Only, the field will be padded with . i.e. ...... instead of _____
- A Global Options tab is available for the File Manager. This gathers all global options relating to the File Manager into a single dialog, which makes them easier to find and modify as needed. Enter OPTIONS FM to reach these settings.
- The ALL line command can be used to apply selected File Manager line commands to every file named in a File List. See discussion below for more information.
File Manager options are set in the Options - File Manager settings page:
- When you check Close SPFLite with last file tab, SPFLite will terminate when the last active Edit/View/Browse Tab closes. If unchecked, and no file tabs are open, SPFLite continues running and the File Manager remains open.
- When you check Confirm file Deletes a popup message will appear when you request a file to be deleted, giving you a chance to confirm that you are deleting the right file.For data security reasons, we recommend you enable this option.
- When you check Display File Manager Help, a Help legend appears at the bottom of the File Manager screen, showing available File Manager line commands that can be used. Depending on whether you are viewing a directory list, a Recent Files File List or a Named Favorites File List, different help legends with different line-command codes are shown. Because different help legends are displayed, and different features are supported on the various screens of the File Manager, most users will benefit from enabling the File Manager Help display. (This is especially so in view of the fact that the File Manager gets progressively updated with new features, which you might not otherwise be aware of.) If you need more room on the File Manager screen and can remember the various codes, this option can be unchecked to regain some space.
Example of File Manager display
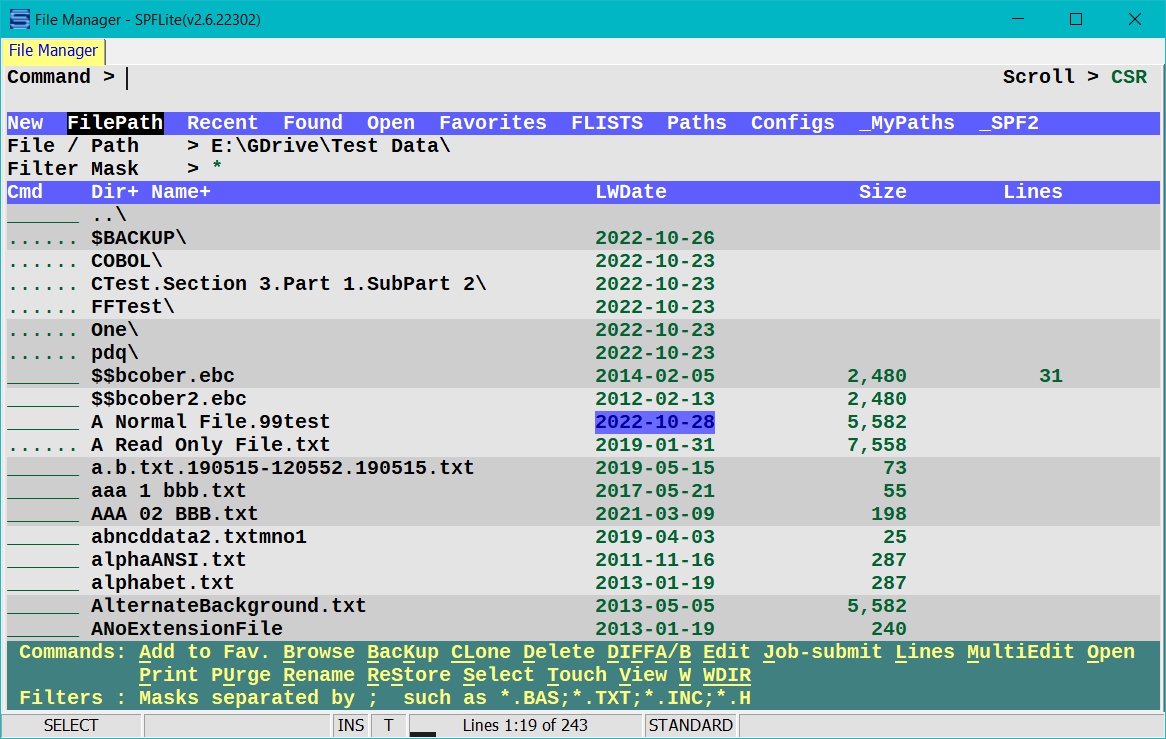
The top part of the File Manager display contains 4 lines which will always be present, even during scrolling operations of the displayed list. These lines are:
|
Quick Launch Bar |
This line contains mouse click-able options to provide fast switching between common selections. File Manager can highlight the currently active selection if desired. To do so, go to Options => Screen and set the BG2 (Background 2) setting for FM Quick Launch Bar to your desired color. Two Keyboard Primitives are available, (FMBack) and (FMFwd). These keys allow you to move back and forth between the various FM display screens in a similar manner to moving back and forward in a Web Browser. This is usually more convenient than using the Quick Launch selections themselves which may also require you to re-enter selection criteria. The Quick Launch options are:
|
||||||||||||||||||||
|
File Path/Name File Patterns |
These lines provide the criteria for a Directory folder display. See Criteria for details. |
||||||||||||||||||||
|
Column Header |
This provides headings for the file list display as well as being a click-able selection line to change the sort order of the display. See Changing the file display order for details. |
Following these header lines will be the detailed list display you have requested. The left side of each line always contains a Line Command input field followed immediately by your selected column choices The specification of what columns and what order you prefer is done in the Options - File Manager dialog, see that for details.
This portion of the display is scrollable when needed using PgUp/PgDown, Mouse scroll wheel, or keyboard Up/Down keys. If you select more columns than will be visible in the screen width, they are all created and you may use the normal LEFT/RIGHT commands to scroll the screen left and right. The 1st column (normally the file name) will be "frozen" and will not participate in the left/right scrolling.
If Hilight Recent / Active Dates has been activated, the dates in the LWDate column will be hi-lighted appropriately. See Hilight Recent / Active Dates for more information.
User Specified QuickList Entries
Many users have custom FLISTs created which are used frequently. To make access to these quicker, and assuming you have sufficient screen width, you can add up to 6 of your own FLISTs to the right side of the QuickList bar. In the sample screen above you can see SPF23 and SPF24 as examples.
To indicate which of your FLISTS you wish placed on the QuickList bar, simply rename the FLIST to begin with an _ (Underscore). The order will simply be alphabetical from left to right.
Managing STANDARD and ALTERNATE Column Layouts
File Manager allows for a wide range of column data, everyone will have their own preference and the column selection can be set in Options => File Manager. With the addition of additional data in the form of Extended Properties, a single layout simply does not suffice, So there are provisions for two different layouts, one referred to as STANDARD and one as ALTERNATE.
How to switch layouts?
The layout used for any folder path or FLIST can be changed at any time by clicking on the box in the Status Bar that contains name of the current layout in use (STANDARD or ALTERNATE). It will toggle to the other one.
The current (latest) layout in use will be saved by SPFLite and will be used again the next time this folder or FLIST is displayed.
Once File Manager has displayed a directory, it will refresh the display with the results of any file activity the next time the File Manager screen is displayed, either by a swap between File Manager and some other tab, by performing some action on the File Manager screen itself, or just pressing Enter.
A refresh can also be requested at any time via the (Refresh) keyboard primitive. You obviously must assign this to some key with the KEYMAP function. This refresh might be needed when the files being displayed were modified by some other non-SPFLite activity.
Specifying the criteria for directory displays
When you are displaying a directory, the header portion of the File Manager screen contains input fields where you specify the directory you wish to be displayed and what file types should be included.
In the File Path/Name field, enter the directory name you wish to be displayed. This may be a simple drive letter like C:\ or a subdirectory like C:\MYDIR\. Path names with embedded blanks are simply typed as-is, with no quoting required. A trailing backslash in a path name should be specified, without the \ the name will not be treated as a path request.
Recursive requests may be made by ending the pathname with two \\ characters. This requests a list of the named folder and all nested folders.
The File Patterns field should contain a list of one or more file patterns or “wildcards” of files you wish to display. The format used is the based on that used by Windows Explorer or the command line.
A ? question mark matches any single character.
An * asterisk matches zero or more characters up to the next specified mask character (or end of filename).
A double asterisk ** matches zero or more characters up to the last occurrence of the next specified mask character. For example **. would mimic Windows Explorer handling of *. which skips to the last period in the name.
To display all files in a directory, specify * or *.* as usual. Multiple file patterns are allowed, each separated by a semicolon. Example: *.BAS;*.TXT;*.INC;*.H
The initial sort order is by ascending file Name. See Changing the file display order below for more information.
The last-used File Path, File Patterns and Sort criteria in effect when SPFLite is terminated are remembered and used for the opening display the next time SPFLite is started. So, if you change the sort order to descending by size, for instance, it will be that way the next time.
SPFLite supports an enhancement to File Patterns to provide extended flexibility in file selection when needed.
Normal file patterns are inclusive; that is, they specify what files to include. You can also specify what files to exclude from the selection process. This is done by preceding an exclusive mask string with a - minus sign. For example, you can say -*.INC to exclude .INC files from the list.
Inclusive masks can optionally include a leading + plus sign, but this is implied and not needed.
How does file inclusion and exclusion work? A file is processed against the File Mask string from left to right, and each pattern in the File Mask is tested against the file name for a match. An overall match result (true or false) is created based on the individual tests.
Note: Even if one test in a chain of tests fails, the remaining tests are still evaluated. This makes it possible to selected files based on rules that amount to, "I want files of one type, except when they are of a second type I don't want, unless those files are of a third type that I really do want."
Inclusive Masks: If matched, the overall match result is true. If not matched, the match result flag is left unchanged.
Excluding Masks: If matched, the overall match result is false. If not matched, the overall match result is left unchanged.
Examples:
|
Filename: |
TestFile.TXT |
|
Mask: |
*.TXT;-Test*.* |
|
Result: |
The file would not be selected. It is accepted by *.TXT but is rejected by -Test*.*. The final overall match result is false. |
|
|
|
|
Filename: |
TestFile.TXT |
|
Mask: |
*.TXT;-Test*.*;*File.* |
|
Result: |
The file would be selected. It is accepted by *.TXT but is rejected by -Test*.*; but then is accepted by the *File.* mask. The final overall match result is true. |
Note: If you begin a File Pattern with an exclusion mask, like -*.tmp, SPFLite will internally prefix this with an *; since beginning with an exclusion mask is illogical.
Set Symbol support in File Patterns
The File Patterns string may now include SET symbols for cases where you may wish to save complex mask strings as symbols for easier use when needed. They are used as replacements for masks as follows: (assume set symbol ABC=*.* and set symbol DEF=*.TXT)
For inclusive masks enter as =abc which would be treated as *.*, or if you prefer explicit inclusive indication +=abc
A mask of =abc;-=def would be treated as *.*;-*.txt
You can apply selected File Manager line commands to a File List, and the commands will be applied, not to the File List itself, but to the files named within the File List. For example, to edit all of the files named in a File List, you would issue the File Manager line command ALL E for that File List.
The ALL command is followed by one of the following commands (all valid abbreviations of these commands are allowed):
BROWSE
CLONE
DELETE
EDIT
MEDIT
NORM
SELECT (same as EDIT)
TOUCH
VIEW
WARNING!
The ALL command, if used against a File List which contains generic path requests, could effectively be directed at what might be hundreds of files. Even if you do not normally receive prompts for file deletes, you will still receive one single prompt for the ALL D command. But a single wrong reply and you could have a huge problem. Take care!
You may select a file for editing, or a directory or File List to be displayed, by clicking on its name with the left mouse button. If you click on any of the underscore characters next to the name, the cursor will be moved to the left hand column of the line command area. This is a quick way to get the cursor moved so you can enter a File Manager line command.
If you click on a name it will be treated as if the SELECT line command S were used. The SELECT line command defaults to a request to EDIT the file
For directories and File Lists, the mouse-select action opens up the directory or File List, and its contents will replace the current display. To return from a lower-level directory to its parent, or to return to the prior display from a File List display, use the primary END command (traditionally mapped to F3), or right-click on the File Manager tab.
You may Right-CLick on any of the list entries to bring up a small Context Menu of commonly used commands. Then you can simply select one of the context menu items with a normal Left-Click.
Note: This will function ONLY IF you do not override the normal (Null) KEYMAP assignment for the Right Mouse Button. The RMB must also have the "Position cursor on mouse-click" selected.
Changing the file display order
When specifying the sort criteria below, the settings are saved as defaults for the current FM display type. e.g. Recent, Favorites, Paths, etc. Separate sort criteria are saved for each of the display types chosen via the Quick Launch bar. This allows you to maintain unique preferences for the differing list types.
The default sort criteria is to sort ascending on filename. The sort order may be changed at any time, by clicking on any of the displayed column headings. There is also a special heading on the left DIr, which controls where folder/directory entries should be placed.
Note: Filenames are normally sorted using the standard Windows Explorer sorting method, where numerical strings are sorted by their logical value, regardless of the length of the numeric string. This option can be overriden by the Options => FM entry "Use simple ANSI sort method". For example of the two sorting results, review the following sample.
Explorer Sort Simple ANSI Sort
2string 20string
3string 2string
20string 3string
st2ring st20ring
st3ring st2ring
st20ring st3ring
string2 string2
string3 string20
string20 string3
The Dir heading does not actually alter the Sort criteria or direction, but is located here for convenience. When clicked, it will 'rotate' through three settings:
Dir+ which requests directory entries are to appear first in the list.
Dir- which requests directory entries are to appear last in the list.
Dir* which requests directory entries be placed alphabetically in the list.
If you click on the other column headings, you will see an extra character appended to the column heading of the columns which is currently being sorted on. This code can be:
+ the sort is Ascending on this column
- the sort is Descending order on this column
* the sort is eliminated, the items are in the order they were read from the FLIST or system directory
. the sort is on File Extension, then File Name (will only be seen on the NAME column.
If you click again on a column which is already selected for sorting, the sort direction will change by rotating through the +, -, *, . options
When a given column is being used as the sort criteria, the data in that column appears in the high-intensity text color, rather than the standard low-intensity text color.
The major topic Working With File Lists provide an extensive description of File Lists and their creation and management.
The Find in Files command FF searches all currently displayed file names for a string value. You can search a directory list, the Recent Files File List or any other File List.
The FF command searches every file that is displayed in the current list. To search a ‘selective' list of files, you can start with a directory list and use the File Patterns field with one or more wildcards to reduce the number of displayed files. You can also add files to a favorites list with the A line command or the FAV edit primary command, and then issue the FF command while the Favorite Files File List is displayed. If you search a File List, you can remove files from the list with the Forget line command F before doing the FF command.
If the FF command finds at least one matching file, it creates (or updates) the Found Files File List and then displays it. When displaying a Found Files list, the FF search command used to create the list will be shown next to the Found Files title on the File Manager display. This will remind you how the Found list was created if you should open it at a later time than its initial creation.
You can issue the FF command using the Found Files File List itself. If you do this with different search strings, you will successively refine the list. That is, if you say FF ABC, then FF DEF, then FF XYZ, you will end up with a Found Files File List that only shows files that contain all three strings ABC, DEF and XYZ. Each time you use a different search against the Found Files File List, the list will get recreated and will (usually) be shorter than it was before.
Of course, if you use an FF command against the Found Files File List with the same search string you used to create it, you would just be searching the files you already found, and it would re-find the same files all over again. That would be called 'going no where fast' (or as a friend used to describe it, "the department of redundancy department").
The Find in Files command FF uses a syntax similar to (but simpler than) the editor FIND command.
Note: the Edit primary command FIND has an alias of FF. This allows you to RETRIEVE the FF command and re-use it in an Edit session as a normal FIND command.
Interrupting an FF search
When the FF command commences a search, it displays a small pop-up dialog:
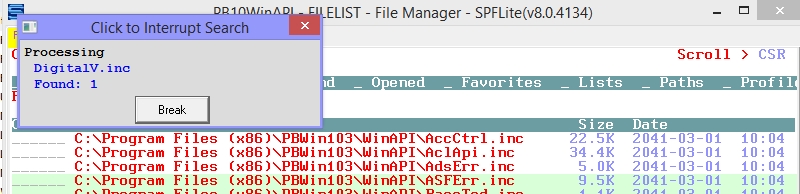
which shows the ongoing progress of the search. You may interrupt the search at any point by left-clicking on the 'Break' button on this dialog. The FF command will complete processing with whatever located files it has already found and display the Found Files list.
FF string [ CHARS | WORD | PREFIX | SUFFIX ] [ NF ]
Operands:
string
Any string value accepted in an edit session is permitted here. The string may be unquoted, or quoted without a string type, or may be quoted with a string type of C, T, X, P or R. Unquoted strings, or strings quoted without a string type, are assumed to be of type C or T, depending on the C/T case indicator on the status line. If the status line indicator shows C or C W, a case-sensitive search is done, and if T or T W appears, a case-insensitive search is done.
CHARS | WORD | PREFIX | SUFFIX
Specifies the ‘search context' for the string, the same as is done for the FIND command in the editor. If not specified, either a CHARS search or a WORD search is done. If the status line indicator shows C W or T W, a WORD search is done, and if just C or T appears, a CHARS search is done. You can change the default search context with the FIND WORDS or FIND CHARS command.
NF
If the Not Found option NF is used, a search is made for files that do not have the string present on any line.
Created with the Personal Edition of HelpNDoc: Free EPub producer