Instances and Configuration
Introduction
SPFLite, when installed, defaults to a fairly normal allocation of files. A new folder "SPFLite" is created in the user's normal "Documents" folder, and all SPFLite related files are created within that folder. For the vast majority of users this is the simplest and easiest to manage choice.
However SPFLite does provide additional flexibility for more advanced users or those with unique requirements for storage of SPFLite data.
The following section is therefore for advanced users only.
As well as providing considerable flexibility in how you can manage the storage of SPFLite parameters and preferences, additional support has been added to assist in running multiple Instances of SPFLite, each with perhaps different sets of preferences and defaults.
Several examples follow to address the more common requirements:
I'd like to get the SPFLite folder out of \User\Documents
I'd like to share my SPFLite configuration between systems
I'd like to create alternate 'Instances' of SPFLite and customize each of them
Using the INSTANCE command to control Instances
I'd like to get the SPFLite folder out of \User\Documents
If you'd like to move the storage of SPFLite configuration data out of \User\Documents\SPFLite\ to another location, then here is the procedure.
- Ensure all copies of SPFLite2.EXE are not running.
- COPY (not MOVE) the \User\Documents\SPFLite\ folder to your new desired location.
- Start SPFLite2.EXE and enter OPTIONS CONFIG.
- At the bottom of the Config tab, alter the two location boxes to your new folder location(s).
- Click DONE, you will be reminded to Restart SPFLite.
- Shut down and Restart SPFLite2.EXE, you will be running on the Moved config files.
- Clean up the old SPFLite config folders at your leisure.
I'd like to share my SPFLite configuration between systems
This need is basically the same as that above. Just choose a Network drive which can be accessed from all involved systems.
Do the change on one system using the instructions above.
Then do the same on each of the other systems, omitting step 2 (Since the data is already ON the Network drive)
I'd like to create alternate 'Instances' of SPFLite and customize each of them
SPFLite support will now allow creation of multiple 'versions' of the execution environment. These versions are referred to as "Instances". Each Instance can:
- Have a unique set of preferences. Preferences are all those settings accessed via the OPTIONS command.
- Share the DEFAULT EFT table, or have a private, unique EFT table.
- Share the DEFAULT keyboard definition, or have a private, unique keyboard definition.
- Share the DEFAULT SET variables, or have a private, unique collection of SET variables.
- Share the DEFAULT command RETRIEVE history, or maintain its own command history.
- Be identified uniquely in the window title bar. The Instance name will replace the normal SPFLite version number.
- If standard windows shortcuts are used to invoke the different Instances, SPFLite now ships with some additional (6) different Icons which can be used to customize the shortcuts for easier reference.
![]() SPFLiteBlackTransparent.ICO
SPFLiteBlackTransparent.ICO
![]() SPFLiteWhiteTransparent.ICO
SPFLiteWhiteTransparent.ICO
 SPFLiteYellow1.ICO
 SPFLiteYellow2.ICO
 SPFLiteBlue1.ICO
 SPFLiteBlue2.ICO
Setting up a new Instance
To create a new Instance: say it is named BILL)
- Copy an existing SPFLite shortcut and rename it to identify the Instance.
- Open Properties for the shortcut.
- Edit the Target command in the Windows Shortcut and add -INSTANCE BILL (or just -I BILL)
- If desired at this point, change the Icon to one of the alternate ones provided. The Icons are located in the normal install folder where the EXE file was placed.
- Close the Properties.
- Double click the Icon.
- You will see the following Prompt:
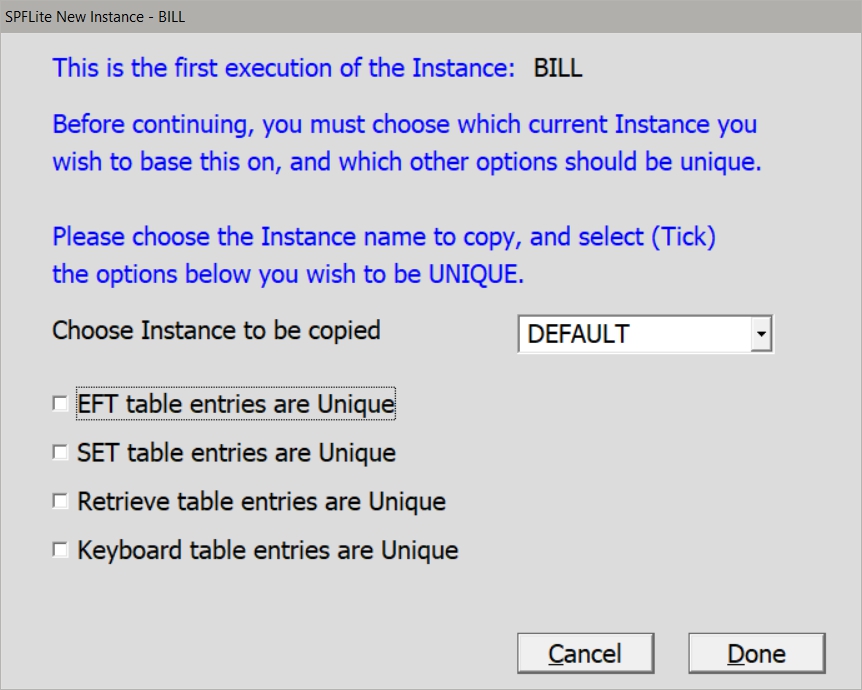
- Choose the name of the current Instance from the drop-down menu which is to be copied as the initial settings for the new BILL instance.
- Select the Unique options. When selected (Ticked) it indicates you wish to make these items unique for the new Instance. If unticked, it means you want this new Instance to share the DEFAULT versions.
- Select DONE. The Instance will be created and SPFLite will continue initialization. The EFT, SET, KBD and Retrieve tables will be copied from the Instance name you chose in Step 1
- The Instance can later be customized as you desire using OPTIONS, KEYMAP, etc.
How to Start an existing SPFLite Instance
To start an existing Instance (say it is named FRED), simply add the following to the Target command in the Windows Shortcut.
-INSTANCE FRED (or just -I FRED)
How to Remove (Delete) an existing, no longer required Instance
To delete an existing Instance, simply go to File Manager, select the Config Display (on the right) and enter a "D" next to the Instance you wish to delete.
Identifying What Instance is Running
The currently running Instance will always be identified in the Windows Title bar. As well, popup dialogues (like Options, KEYMAP, etc.) will always show the Instance name in the title bar. This is important since an Instance may be sharing some preferences (like Keyboard) with the DEFAULT Instance and even though you are running a separate Instance, changing the Keyboard definitions may be altering the DEFAULT keyboard definition. Always check what is displayed if you are not sure. If you use the "Minimize to the System Tray" option, hovering over the tray Icon will display the Instance name for all non-DEFAULT sessions.
Using the INSTANCE command to control Instances
Although Instances can be invoked with a customized Icon as described above, if you have more than a couple instances, this becomes more and more impractical. The INSTANCE command allows you to startup and/or switch to another instance quickly, without the need to customize an Icon, or open a command window to add additional operands to the startup.
How to create a new Instance
Let's assume you are running a normal Default SPFLite session, and you want to create one named TEST.
Enter:
INSTANCE TEST KEEP (INSTANCE can also be abbreviated as INST)
The KEEP operand requests the current DEFAULT session remain active. A new SPFLite windows will appear as described in "Setting Up a New Instance" above. Follow those instructions and your new Instance will be active.
If you don't require the existing DEFAULT session to remain open leave KEEP off. If you have open Edit tabs, use the SAVE or CANCEL operands to indicate how you want them handled.
How to switch to another existing Instance
This is identical to creating a new instance, except the creation step is bypassed.
Using the -F and -D operands
When switching to another instance, you may request the addition of the -FILEOPEN and -DO startup operands.
Enter:
INST TEST -F C:\MYLIST.TXT -D MYDOMACRO CAN
This requests a switch to a TEST Instance, adding the -FILEOPEN and -DO operands. The existing session will close and any open edit tabs will be closed with a CANCEL command.
Switching to the existing Instance
Yes, this sounds a bit weird, but it does have a purpose. Using the -F operand, it allows you to use the FILEOPEN support to open a list of filenames in the current session. Assuming you are running in the DEFAULT Instance, and have created a FILEOPEN file named "FILES.TXT".
Enter:
INST DEFAULT KEEP -F C:\ADDFILE.TXT
This will result in the files listed in the ADDFILE.TXT file to be opened in the current DEFAULT session.
Switching Instances and keeping the active tabs
Say you have several files open in the DEFAULT Instance, but you want to continue editing them in your FRENCH Instance (which has, say, unique keyboard mapping). As long as SAVEing them during the switch is OK, you can.
Enter:
INST FRENCH -F * END
This uses the feature of INSTANCE which saves the current tabs file list as _FILEOPEN.TXT in the SPFLite Home folder. The "*" operand for -F requests this standard file be used as the FILEOPEN. The current session will close all tabs via END, and then the same files will be re-opened in the new FRENCH instance.
Created with the Personal Edition of HelpNDoc: Easily create Qt Help files