Line Labels
Contents of Article
Temporary line labels, also known as line-number pseudo labels
Using the single character line range arguments
Using Labels with the LINE Command
Introduction
Users of SPFLite and/or ISPF are familiar with line labels. A line label is a . dot followed by one or more letters, and appears in the sequence area.
Note: The line number sequence area size on the edit screen is adjustable from 5 to 8 positions. This means the maximum size of a label or tag that you can type into a sequence area is from 4 to 7 letters, after the leading dot or colon. Internally, SPFLite maintains an 8-position sequence area, and only displays as much as will fit.
This means that labels and tags on the primary command line can actually use the maximum internal size (a dot or colon plus up to 7 letters). When you do this, only part of the label or tag is displayed, but the entire value is present. That should not pose a problem if the labels are being managed by macros, but if you enter such labels manually, be careful you don't confuse yourself, since you won't see the entire label displayed on the edit screen.
Labels are associated with the data line itself, not the particular line number they are on at the moment. So, if lines are inserted or deleted prior to the labeled line, or if the labeled line itself is moved, the label stays with the line. If there are two lines, one with label .AA and one with label .BB, ISPF allows you to issue primary commands like this:
CHANGE ABC DEF ALL .AA .BB
and all lines from .AA to line .BB, inclusive, will be changed. It doesn't matter if .AA comes before .BB or vice versa; the CHANGE will work the same way.
If you only want to change a single labeled line by itself in IBM's ISPF, you have to repeat the label, like this:
CHANGE ABC DEF ALL .AA .AA
but SPFLite allows the second label to be omitted if it's the same as the first. So the same thing can be done with just:
CHANGE ABC DEF ALL .AA
There are several "special" line labels that are available:
.ZFIRST (or .ZF) to indicate the first data line of the file
.ZLAST (or .ZL) to indicate the last data line of the file
.ZCSR to indicate the line in the data area where the cursor is located
.ZFIND to indicate the last (most recent) line found by a FIND command
.ZFINDA to indicate the First line found in a FIND ALL request
.ZFINDB to indicate the Last line found in a FIND ALL request
.ZLOC to indicate the last (most recent) line found by a LOCATE command
.ZLOCA to indicate the First line found by a LOCATE ALL command
.ZLOCB to indicate the Last line found by a LOCATE ALL command
.ZTOP to indicate the Top visible line of the screen / panel
.ZTOP to indicate the Bottom visible line of the screen / panel
For .ZCSR, the cursor must be on a data line (or the sequence area of a data line) in the edit screen.
For .ZFIND and .ZLOC, you must have issued at least one prior FIND, CHANGE or LOCATE command for the current file.
Otherwise, it is illegal to use these three special line labels, and you will get an "undefined label" error message if you try.
Temporary line labels, also known as line-number pseudo labels
Sometimes you may need to use a command like CHANGE on a known range of line numbers, but the CHANGE command doesn't accept actual line numbers as operands to indicate line ranges. There are other ways to do it, but often what happens is that you end up doing this:
- Temporarily place one-time labels like .A and .B on the ends of the desired range
- Issue the CHANGE or other command, referencing .A and .B
- Go back and get rid of the temporary labels .A and .B
Suppose you knew ahead of time that the .A label will go on line 100, and the .B label will go on line 200. With SPFLite you no longer have to “invent” these .A and .B labels. You can use temporary line labels, also known as line-number pseudo labels. Such a pseudo label is a . dot followed by a line number. The line number is handled numerically, not as a string. So, for example, a pseudo label of .100 or .00100 both refer to the same line.
You can use a pseudo label in commands just like a real one.
Using the single character line range arguments.
When text is selected using mouse drag or via the keyboard Shift-Arrow keys, a block of text is defined and highlighted on the screen. The line and column range of this selected area is remembered and can be used to quickly re-select the area for further processing if desired.
When an area is selected, the line and column references of the area are displayed in a Status Bar box for reference. That portion of the Status Bar would appear as
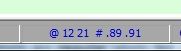
where the @ and the two numbers following represent the column range of the selected area, and the # and the two operands following represent the line range of the selected text.
The significance of the @ and # characters is both to identify which pair of numbers is which, but also to remind you that these single character values can now be used on the Primary command line for commands that accept line/column range operands.
For example, using the above displayed sample, a command line of PRINT # would be treated as if it were entered as PRINT .89 .91 to print the selected line range.
A change command CHANGE AAA BBB @ # would be treated as CHANGE AAA BBB 12 21 .89 .91. i.e. Change AAA to BBB on lines 89 to 91 between columns 12 and 21.
The values displayed are persistent and will remain available for repeated use on commands until a new, replacement text selection is made or a RESET command is issued.
Suspending the Range
You may temporarily suspend the @ and # processing on the command line by simply left-clicking on the Status Bar box displaying these values. When you do the box will switch to
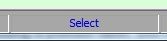
This display indicates that an area has been selected and is currently inactive. At this point use of @ and # on the command line will not trigger substitution of line/column values.
A left-click on this box at this point will switch back to the normal select display, and will also re-select the text area on the screen for confirmation.
Using Labels with the LINE Command
You can manage line labels and line tags using the LINE primary command. For example, to put a label of .ABC on line 10, you can issue the command:
LINE '.ABC' .10
Remember to quote the label, because in this example, the first operand '.ABC' is what goes into the sequence area, and the second operand .10 is where the first operand is placed.
When doing a normal edit, there is usually no need to do such a thing; you would just put the label on the line directly. However, when running a programmable macro the LINE primary command is the only way to do this. You would need to 'wrap' the LINE primary command in an SPF_CMD function call in your .MACRO file, like this:
SPF_CMD ("LINE '.ABC' .10")
It is possible to set, clear and toggle both line labels and line tags from the LINE primary command. The possible options are as follows:
LINE '.label' -- Enter label into sequence area
LINE '..label' -- Toggle label; enter label if no label present,
-- else clear any label that is present
LINE '.' -- Clear any label that may be present
LINE '..' -- Clear any label that may be present; same as LINE '.'
LINE ':tag' -- Enter tag into sequence area
LINE '::tag' -- Toggle tag; enter tag if no tag present,
-- else clear any tag that is present
LINE ':' -- Clear any tag that may be present
LINE '::' -- Clear any tag that may be present; same as LINE ':'
See LINE - Apply Line Command and Working with the LINE Primary Command for more information on the LINE command.
See Special Line Commands in Using the KEYMAP Dialog for more information on performing these same actions within a KEYMAP definition.
Labels are obviously well suited to use as Bookmarks. A discussion and examples can be found here.
Created with the Personal Edition of HelpNDoc: Benefits of a Help Authoring Tool