SPLIT and JOIN Commands
Contents of Article
Example 1: Split comma-separated values, discarding commas
Example 2: Split comma-separated values, retaining commas before split
Example 3: Split comma-separated values, retaining commas after split
Example 4: Split data without delimiters
Example 5: Split using Picture and Format strings
Example 7: Split on delimiter and blank
Example 8: Split using F'!|' change string
Example 9: Split using a regular expression
Example 10: Split on left using P'[string'
Example 14: Left join with dash inserted
Example 15: Right join with space between
Example 16: Right join without space between
Introduction
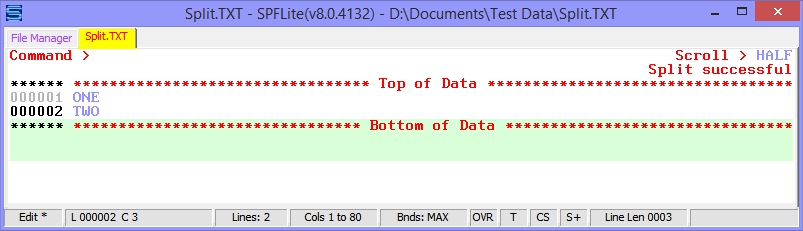
The SPLIT edit primary command is used to selectively split apart lines of text based on a search string. After a split occurs, a line on which the from-string is found will become two lines. Everything before the "split point" will be on the first line, while everything after the split point will be on the second line.
The JOIN edit primary command is used to selectively combine lines of text based on a search string. After a join occurs, a line on which the from-string is found will be combined either with the line before it, or with the line after it. So, each time a join takes place, two lines of text will become one line of text.
This section provides a number of examples of how to use the SPLIT and JOIN commands. Because these commands provide complementary functions, they are grouped together here. See SPLIT - Split Lines Using Find/Change Strings and JOIN - Join lines Using Find/Change Strings for detailed descriptions of the command syntax.
Because the precise state of your data lines may be critical to how a SPLIT or JOIN command operates, in some cases (depending on your requirements) it may be important to manage the trailing blanks that might exist on the lines you are splitting or joining. For example, if you wished to trim the entire file of trailing blanks, you can place a line command of TR/ on line 1 and press Enter. You may find the line commands TR/TRR, PL/PLL and TL/TLL, and the primary commands APPEND and PREPEND to be useful in conjunction with SPLIT and JOIN, either to prepare lines for SPLIT/JOIN processing, or to modify them afterwards.
Bear in mind that SPLIT and JOIN are treated as specialized forms of FIND and CHANGE. This means that the RFIND/RLOCFIND and RCHANGE commands (usually mapped to F5 and F6) may be used to selectively find text on lines to be split or joined using F5, and then you can selectively perform the SPLIT or JOIN with F6 if that is what meets your requirements; it's not necessary to always use the ALL keyword to process your entire line range.
A JOIN from-string may be specified as a Regular Expression, in addition to a Picture string.
A JOIN from-string must be either:
- a Picture string in one of the following formats:
P'[string'
JOIN is being asked to perform a left-join operation. The value of string must appear on the left side of lines within the line range in order to be joined; otherwise any lines not beginning with string will be ignored for JOIN purposes. When a [ Picture code appears in the from-string of a JOIN command, it must appear in the left-most position of the Picture string, and nowhere else.
P'string]'
JOIN is being asked to perform a right-join operation. The value of string must appear on the right side of lines within the line range in order to be joined; otherwise any lines not ending with string will be ignored for JOIN purposes. When a ] Picture code appears in the from-string of a JOIN command, it must appear in the right-most position of the Picture string, and nowhere else.
- a Regular Expression string in one of the following formats:
R'^expression'
JOIN is being asked to perform a left-join operation. The regular expression must start with the ^ directive to indicate the left-hand edge of the line. The remaining expression may be any valid RegEx expression.
R'expression$'
JOIN is being asked to perform a right-join operation. The regular expression must end with the $ directive to indicate the right-hand edge of the line. The remaining expression may be any valid RegEx expression.
The section on JOIN command examples starts here.
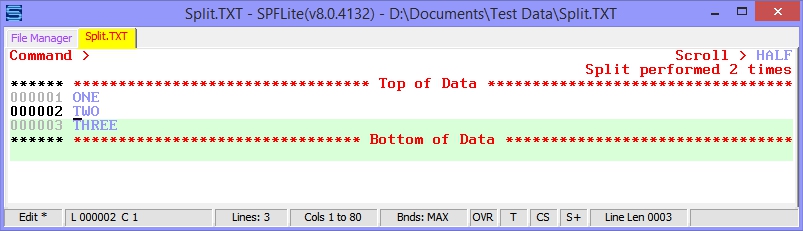
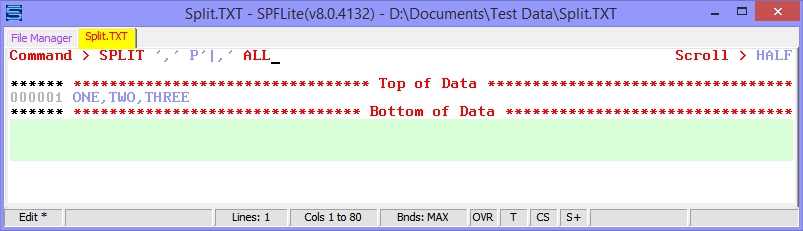
Example 1: Split comma-separated values, discarding commas
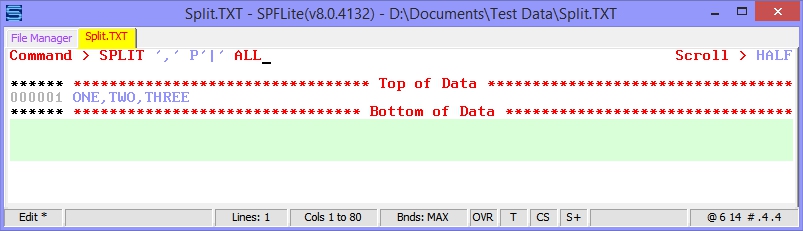
Result: Each place that a comma is found is split to form a new line. Two commas are found, so two splits occur. Since the change Picture has the vertical bar | split code but nothing else, the commas that are found are "consumed" by the splitting process, and so they don't appear in the result.
Example 2: Split comma-separated values, retaining commas before split

Result: Each place where a comma is found is split to form a new line. Two commas are found, so two splits occur. Since the change Picture has a comma before the vertical bar | split code, the commas that are found are first "consumed" by the splitting process, and then re-inserted back because of appearing in the Picture string, so that they appear at the ends of lines 1 and 2.

Example 3: Split comma-separated values, retaining commas after split
Result: Each place where a comma is found is split to form a new line. Two commas are found, so two splits occur. Since the change Picture has a comma after the vertical bar | split code, the commas that are found are first "consumed" by the splitting process, and then restored because of appearing in the Picture string, so that they appear at the beginning of lines 2 and 3. Compare examples 2 and 3. See how characters before the vertical bar are on the first line of a split, while characters after the vertical bar are on the second line of a split.

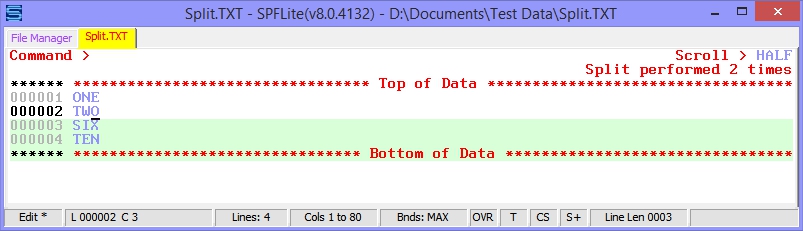
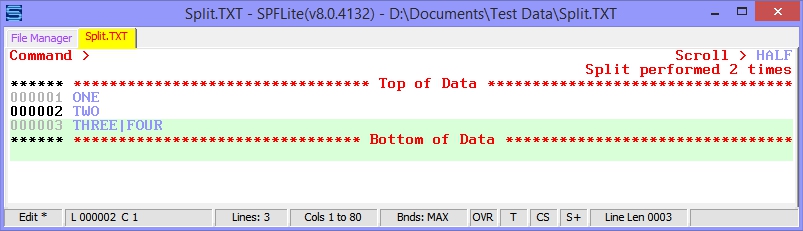
Example 4: Split data without delimiters
When you have to split some text that doesn't have any delimiters, you may have to repeat some or all of the find-string data in the change string.
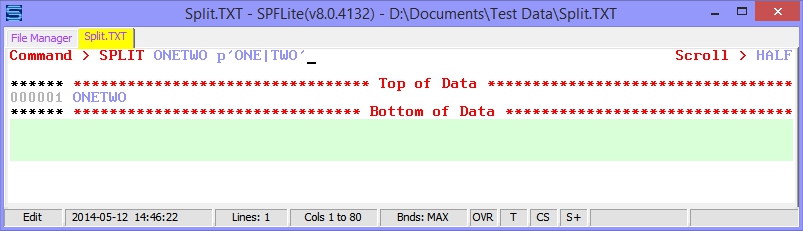
Result: ONETWO on one line is replaced by ONE and TWO on two lines. We had to repeat the original data appearing in the change-string with a split mark of | in the middle of the change string.
Example 5: Split using Picture and Format strings
You can use a Picture for the find-string, so that the change-string is handled 'generically'. Here we are splitting all strings of 6 upper case letters. Note the use of the F-type Format string for the change-string.
We use a Format, because the '=' signs don't correspond to the same positions between the find and change strings, and so a P-type Picture string won't work. That is, the right-hand 3 '=' signs are in position 5-7 of the Format string, but they correspond to positions 4-6 of the original data.
The one-character shift is the result of the fact that the vertical bar | code does not correspond to a character position of original data, but it 'takes up a place' in the string, so we must use a Format string here in order to be consistent with how Formats are used elsewhere, like in CHANGE commands.
If you had used a Picture here instead of a Format, you would get an error message, "CHANGE chars =<>~ appear past the length of the Find string". As you can see below, the Format string contains 7 characters (6 = equal signs and one | vertical bar) whereas the find-string is a Picture string of length 6. If the change string were a Picture instead of a Format, the right-most = equal sign would correspond to "position 7" of the found string. Since the first operand is of length 6, there is no position 7, and that's why an error occurs. Format strings deal with character positions differently, and that's why it works. See Specifying a Picture or Format String for a detailed discussion of these issue.
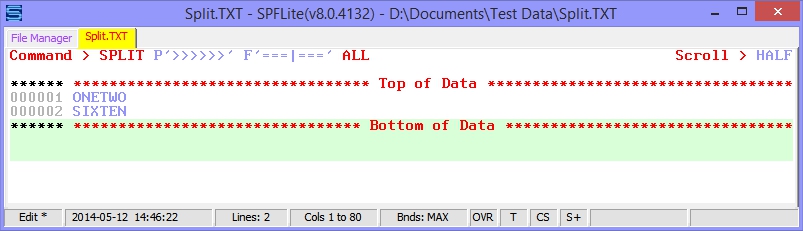
Result: Both lines are split, making four lines from the original two. In the change Format string, the first three = equal signs, before the | vertical bar, correspond to the first three positions (1-3) of the strings ONETWO and SIXTEN, and the second three = equal signs, after the | vertical bar, correspond to the last three positions (4-6) of those strings.
Now you can start seeing some of the real power in using SPLIT with Pictures. You are not just finding delimiters and breaking lines apart by using them, but here we actually split lines based upon undelimited text contents.
Split a line on dashes, which are then discarded. Note that a literal | vertical bar in the data does not cause line splits, and is not confused in the SPLIT operation. You can also specify the command as SPLIT '-' F'|' ALL.

Result: See that the | literal data is still present. The mere fact that a Picture split code is specified as | has nothing to do with an ordinary | vertical-bar character appearing in your data.
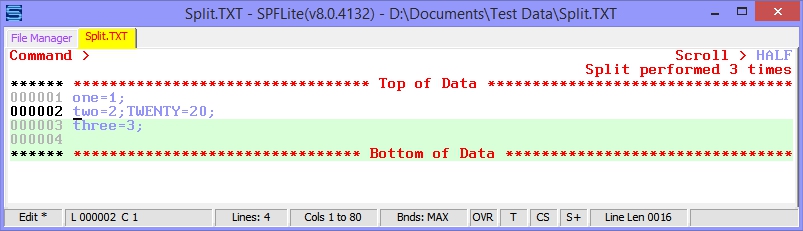
Example 7: Split on delimiter and blank
Split apart some programming statements: only split where a semicolon is followed by a blank, then discard the blank after splitting.
Because split-point strings are discarded, the resulting lines don't have trailing blanks on them. Blanks have been highlighted in blue for clarity. The split points are substituted where the blanks were located, and are then discarded after the split.
You can also specify the command as SPLIT '; ' F';|' ALL.
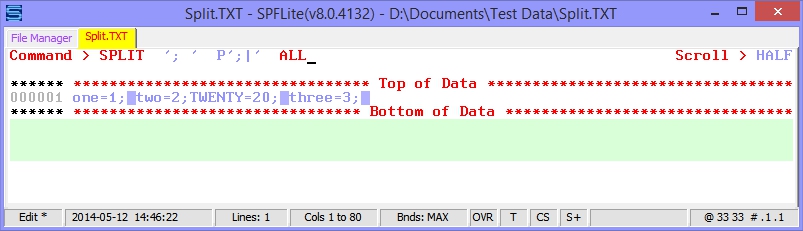
Result: Notice that the part with "two=2;TWENTY=20;" does not get split. That's because the part with "two=2; " didn't have a blank after it, and the SPLIT find-picture insists on a blank after the ; semicolon. The result lines do not have any trailing blanks on them, and the last line is a zero-length line.
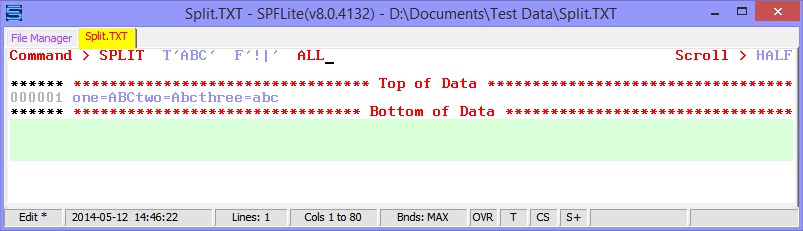
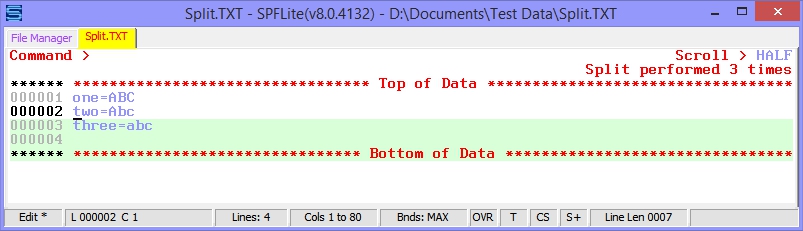
Example 8: Split using F'!|' change string
Split apart lines using the ! code in for string-2. This ! code represents the entire string found by the 'find-string' of T'ABC', which in this case will be any of the letters ABC regardless of case. Because the entire string that was found will appear in the change-string, no source characters are deleted (lost) during the split process.
This command could also have been specified as SPLIT T'ABC' P'===|' ALL or as SPLIT T'ABC' F'===|' ALL,
but using the ! notation is more concise, because no matter how long the found-string is, only a single ! code is needed in the change Format.
Result:
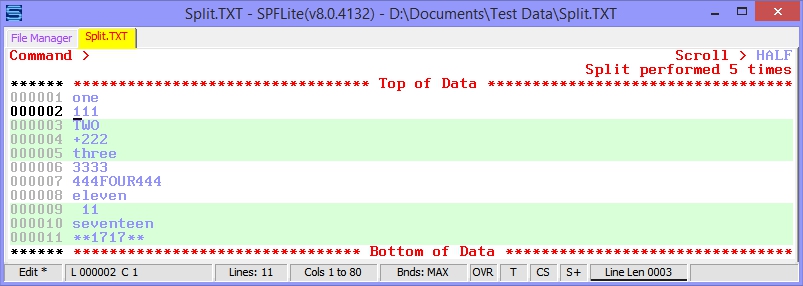
Example 9: Split using a regular expression
Sometimes your data is not very well-defined, but you need to split it anyway. Below, we have a file in which we want to split lines where there is a "word" at the beginning of the line, so that the split happens at whatever follows the "word". The problem is that the words vary in size, don't always begin the line, and have inconsistent data following them (digits, special characters and blanks appear after the words). There is no specific data we can "home in on" to decide where splits should be done. The best way to find such strings is with a Regular Expression. The Regular Expression codes ^ and $ correspond to Picture codes of [ and ]. We can use that fact to look for "words" that only begin a line and no where else. Then, using the fact that the ! Picture/Format code represents the entire found-string regardless of length, that will do nicely for the change-string.
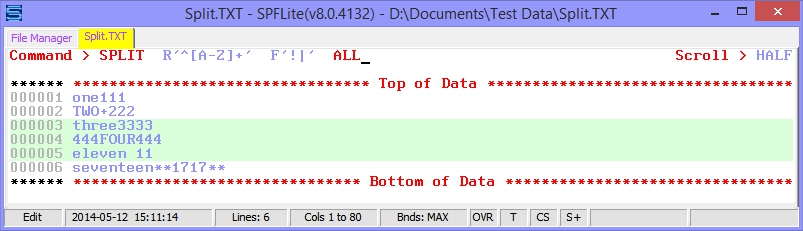
Result: Note that on original line 4, the data 444FOUR444 doesn't meet the criteria, because the "word" FOUR doesn't start the line. So, that line doesn't get split. Out of 6 original lines, just 5 of them are split. See how the ! code represents each of the "word" strings in turn, even though they are of differing sizes. This example also demonstrates how powerful Regular Expressions can be. We needed to find strings that were ended, not by a delimiter or by a fixed length, but by a character that was not in the correct "class" (alphabetic, in this case). Only a Regular Expression could do that.
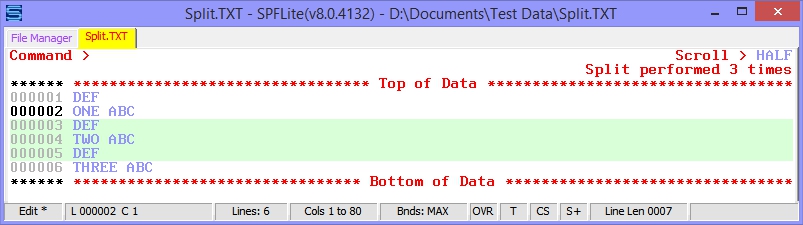
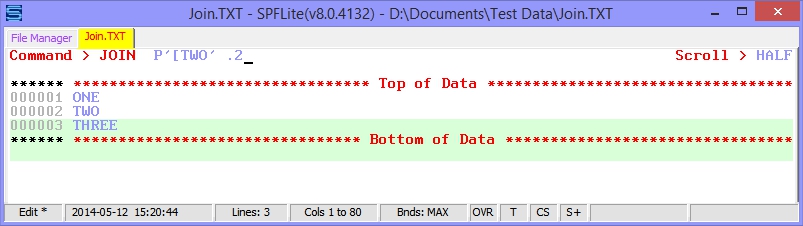
Example 10: Split on left using P'[string'
Given the file below, we want to replace the first ABC on each line with DEF, and remove the blank that follows it, and then split the lines.
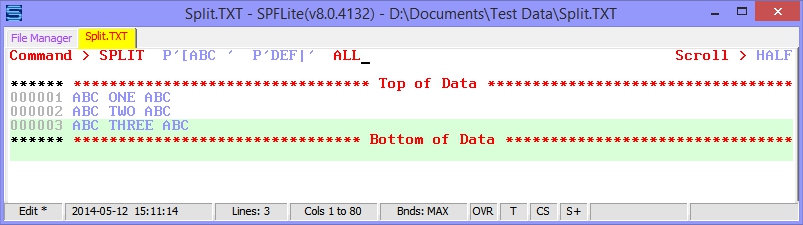
Result:
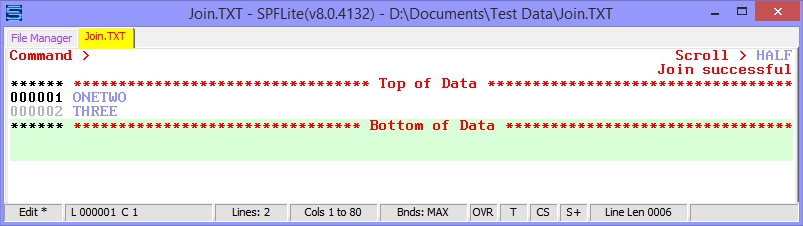
A left-join is performed on line 2.
Result: The left side of line 2 is joined with the right side of line 1. Former lines 1 and 2 are combined into a new line 1, and the former line 3 becomes the new line 2.
A right-join is performed on line 2.

Result: The right side of line 2 is joined with the left side of line 3. Former lines 2 and 3 are combined into a new line 2.

If you look at the first two JOIN examples (11 and 12 above), you will see that there is no second string operand. When you omit this, JOIN assumes that the second operand is P'!'. That is, whatever string is found using the first operand is appended to the joined line. (Recall that P'!' stands for the value of the entire found string, regardless of its length.) In example 12, this means that you will get the same results by any of the following commands:
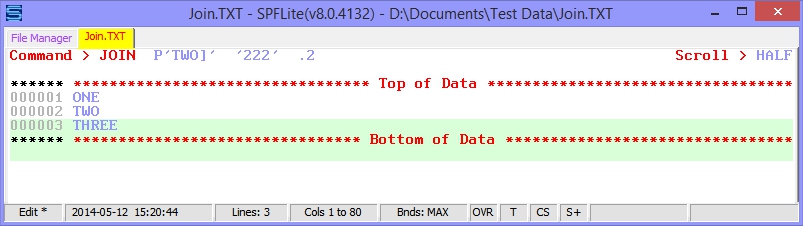
JOIN P'TWO]' .2
JOIN P'TWO]' 'TWO' .2
JOIN P'TWO]' P'!' .2
Try it yourself, and convince yourself that this works. We can call this a "simple join".
Now, internally this is what is really happening:
- A line with "TWO" at the end is found (the ] right bracket means "at the end")
- The string "TWO" is deleted from the end of line 2
- The contents of line 2 (with the ending "TWO" removed) plus the string "TWO" plus the contents of line 3 are concatenated together to make a new line 2.
Why are we describing this in such excruciating detail? It all seems very obvious, even redundant, that it works this way. Well, not entirely. The point is, we can use something for the "middle" part of this concatenation process other than the string that is found.
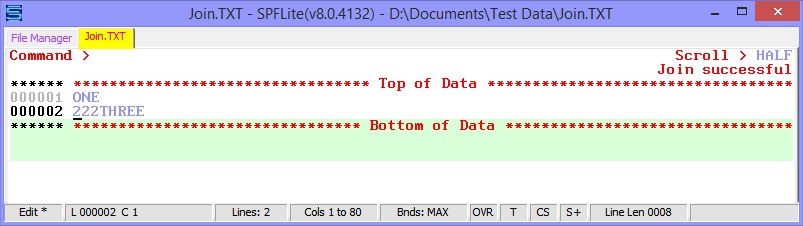
Here, we are going to join lines 2 and 3 again. But, instead of merely joining them, the string "TWO" is going to be replaced by "222". When you understand the process above for a "simple join", joins that are not as simple will make sense to you.
Result: As you can see, the string "TWO" that was found by the first operand of JOIN is replaced by "222" instead of being merely repeated. If you like, you can call this a "replacement join" if you want a fancy term for it.
Example 14: Left join with dash inserted
In the file below, line 2 is joined to the end of line 1, even though line 1 is not within the line-control-range specified on the command. This is because the leading P'[' code on the search string defines a left-side alignment, and left-sided JOIN. For a left-sign join, when the first line of the line range is matched by the JOIN find string, a join takes place between the first line of the line range and the line which precedes it (if one exists). In this example, that means that line 2, the beginning of the line range .2 .3, will be joined to the line that precedes is, which is line 1.
In the find-picture, the = equal sign successively matches to the first character of each line, which is, in order, O, T then T again. The change string first inserts a - minus sign, then repeats the character matched by the find-string (O, T then T again), and then finally it joins the lines.
A left-side join joins to the line before it, whereas a right-side join joins to the line after it. So, in this case, line 2 is left-joined to line 1, then line 3 is left-joined to line 1.
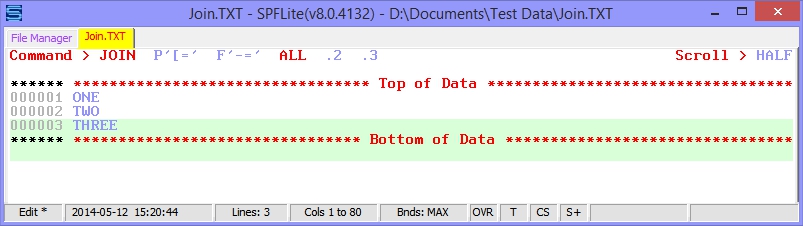
Result: The lines in the line range are joined together with dashes between them.
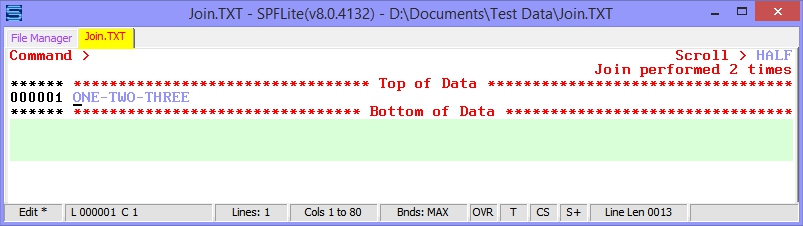
Example 15: Right join with space between
Assume in the file below that lines 1-3 are trimmed of all trailing blanks. This is a necessary condition for this example, and can be enforced with a TR line command. The change string includes a ';' semicolon to restore the one being matched against, and a blank for readability. Note that the join process consumes the empty line 4, because we are doing a right-join here.

Result: The four lines are joined into one. Because line 3 is joined with line 4, and '; ' is inserted between them, and line 4 was a zero-length line, line 1 of the result will have one trailing blank on the end, inserted there as part of the '; ' change string.
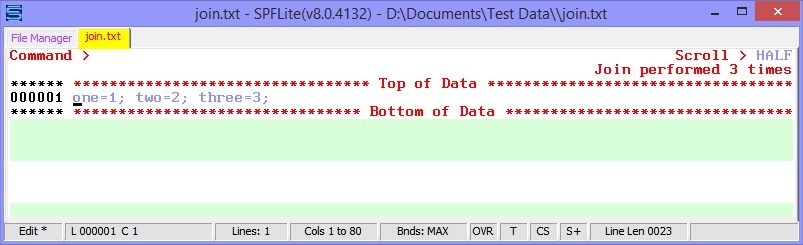
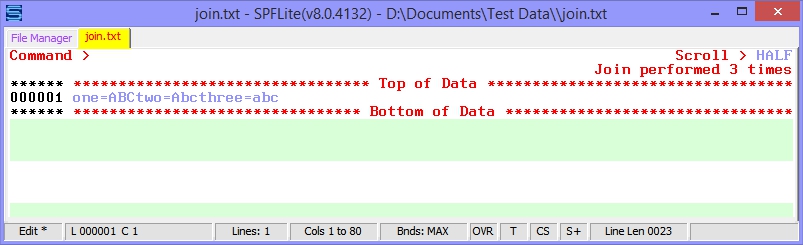
Example 16: Right join without space between
Here, we are joining together 3 lines into one with no spaces between. This action consumes line 4. The JOIN find Picture P'=]' here matches the last character of each line, which is C, then c, then c again. The change Picture of P'=' replaces each C or c "with itself".
Result: The three lines are joined together as one, and the blank line 4 has disappeared.
Created with the Personal Edition of HelpNDoc: Maximize Your Productivity with a Help Authoring Tool